How to Record Audio on Google Slides 2023 [FREE]
Google Slides, as an online presentation maker, is frequently used for lectures, meetings, and many other collaborative occasions. Adding background audio to a slideshow will help you to set the mood or make the content more instructive and easy to understand. Since Google Slides has no preinstalled audio recorder, this article presents three free and simple voice recorders to help you insert audio files into your slideshow. Comprehensive audio recorder introduction and detailed steps are clarified. Read on to get what you want!
How to Record Audio on Google Slides for Free 2024
Google Slides is a versatile tool that you can use on any web browser as long as you have a Google account. Whether using an iPad, Chromebook, Macbook, or Windows computer, you have the easiest way to create and view a Google Slideshow. This online slideshow maker can be used for presentations, lectures, meetings, and many other collaborative projects. It has almost all the functions of the Office Presentation, like inserting audio, videos, charts, and tables. By adding audio to a slideshow, you can set the mood of your presentation or narrate a story, share instructive suggestions, and give feedback for work.
However, Google Slides does not have a built-in tool for audio recording. You can only create audio files with third-party voice recorders. The good news is that a wide range of free audio recorders for Google Slides is available, including desktop tools like WorkinTool iRecorder and Audacity, as well as online extensions like Mote. It is super easy to use them to generate audio files, upload them to Google Drive, then add them to your target presentation. You don’t even need to learn any technical skills. This post will share exactly how to record audio on Google Slides presentations using offline and online audio recorders. We’ll show you how to insert audio into a slide so others can play it successfully. Read on to learn more!
How to Record Audio on Google Slides with WorkinTool
WorkinTool iRecorder is a professional desktop audio recorder for Windows users. This lightweight recording tool packs system audio recording and microphone voice recording together into a simple and clean interface. It is super easy and free to use. It sparkles because you don’t need to register or log in with license payment. You just need to download it from their website, install it on your computer, configure the audio input, and begin recording. You have one hundred percent control of the audio input, voice volume, hotkey setting, audio quality, and so on. It supports MP3 and WAV output formats. Noise reduction is available as well. So you can easily record high-quality audio with ease.
Not only for Google Slides, but you can also make use of this tool to record anything on your desktop, like recording Discord calls and recording audio from YouTube, and more. The recorded files will be automatically saved when you end recording. Here look the detailed steps of recording audio using iRecorder.

- First Step: Go download and install the WorkinTool iRecorder on your Windows computer and launch it.
- Second Step: You will see three options on the main page: System Sound, Microphone Voice, and the Record button.
- Third Step: Press the blue Record button (or Alt+F1) to record audio when you are ready (The hotkey is also suitable for pausing recording).
- Final Step: Stop recording by clicking the red button in the picture (or Alt+F2).
📢Notice
- If you want to record your computer sound with your voiceover, turn on both the System Sound and the Microphone Voice options (make sure you have connected your computer with a mic).
- If you just need to use one of the sounds, click the downward arrow beside the options to open the dropdown menu and turn a source off.
- Before recording, you can check the general settings by clicking the bottom Settings button. It supports you in changing the sound source, hotkeys, output formats, audio quality, auto-saving mode, and noise reduction status.
Once you stop, the audio file will be auto-saved to your computer. You will see a recording history and check the result on the final page. More features like editing the recording, changing its cover, and modifying other information are attainable.
How to Record Audio for Google Slides with Audacity
Audacity is free and open-source audio recording software for Google slides. This cross-platform voice recorder is compatible with Windows, Mac, Linux, and other operating systems with no pressure. Similar to WorkinToo iRecorder, it can record audio from a computer and microphone. The highlight lies in that you can cut, copy, and paste the voice recording unlimited times. So it will be convenient for you to edit the audio without switching software.
But the interface is more complicated and old-fashioned, so you must pay more attention when using this software. Check how to record audio on Google Slides with Audacity below.
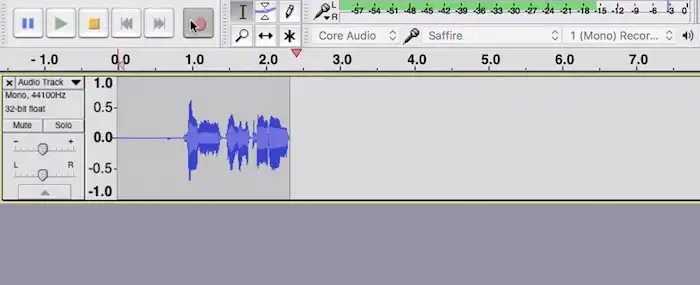
- First Step: Run Audacity, check the recording devices (right to the microphone icon), and choose the one you want to record with.
- Second Step: Click the red button to start recording and press the yellow button to stop recording.
- Third Step: You can press the green button to preview the audio recording or click File > New to create a new audio track.
- Final Step: Click File > Export Audio to download the recorded audio.
How to Record Audio on Google Slides Online
Except for the offline tools, a wide range of online voice recorders can add audio to slideshows directly. Google extensions are the most frequently used and convenient ones. As long as you have a Google account, you can easily log into Mote—an audio recording extension without hidden costs or additional steps to insert background audio into your slides. With a free Mote account, you can record up to 30 seconds per recording. There are a few simple steps you can follow that we’ll discuss below.

- First Step: Go to Chrome Web Store to add the Mote extension to your Google browser.
- Second Step: Log into Mote with your Google account.
- Third Step: Create a new slideshow and click the Mote icon in the top right corner to grant it access to your Google account.
- Fourth Step: Back to the presentation you create and hit the Mote icon one more time to start recording the voice.
- Final Step: When you finish recording, click the Insert button to add the audio file to your slide.
How to Insert Sharable Audio into Your Slides
When recording is over, check the following steps to insert sharable audio files to your slide. It makes sure the slideshow viewers can play it.
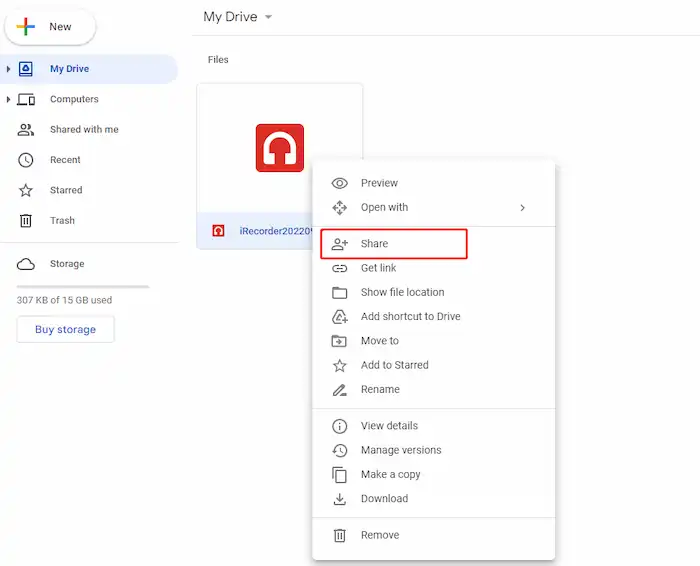
- First Step: Log into Google Drive, and click the + New > File upload to upload your audio files.
- Second Step: Right-click the file you upload and select Share. Give general access to anyone with the link and click Done.
- Third Step: Open or create a Google Slides file where you want to insert audio.
- Fourth Step: From the top toolbar, select Insert and press Audio.
- Final Step: Choose the audio you just granted access to and then click Select.
Wrapping up
This article explains how to record audio on Google Slides with three free and easy-to-use audio recorders. You can easily record advanced and high-quality audio offline with WorkinTool iRecorder and Audacity. More convenient online voice recorder extension Mote is practical as well. If you have figured out how to record and insert audio files on Google Slides, pick a tool and start your journey!