How to Overlay Images on PC Free 2024
Combining multiple images is always the first problem that people want to deal with when editing pictures. So the need to learn how to overlay images comes out with it. However, even though most people would choose Photoshop, the professional image editor. Its overcharged price and hard learning steps shout a big part of amateurs out. Here I highly recommend a new image software – WorkinTool Image Converter. You can use three built-in functions to achieve overlaying images. What’s more, it is 100% free to use. So, go download and experience the magic yourself now.
😎 300+ different models and styles
😆 Custom AI image generation available
😍 Various image generation results
😘 Provide Text-to-Image and Image-to-Image Generation
🥰 Easy and fast operation and generation
How to Overlay Images on PC Free 2024
Combining multiple images is probably the most basic image editing function that you might need to master. It is also the foundation to create all sorts of art and realize imagination. However, even if we say that it is basic, the difficulty is not something that we can easily deal with without practice. It is still very hard to master how to overlay images.
Well, luckily, there are three alternatives that I am going to introduce. Without learning the excessive Photoshop guide, you can easily get the job done in seconds.
Three Alternatives to Overlay Images
When speaking of overlaying images, something is difficult for image editing amateurs, the first image editor tool that comes to people’s minds is Photoshop. However, not everyone is willing to pay the expensive fee for the functions. Except for the payment, even though there is a detailed tutorial about how to overlay images in Photoshop, too many procedures and an extremely high degree of difficulty are always warning people that this is not the work of amateurs. For that reason, if you can have a try on another professional desktop tool that contains editing and adjusting image functions, you can save a bunch of time and energy on something else.
That is why my friend, I strongly suggest you try this amazing software – AI-powered WorkinTool Image Converter. It is a newly published image tool. But don’t underestimate it just because it’s new. Small as it is, the sparrow has all the vital organs. You can do all the image-related operations with this software. Editing photos and image conversion are the basic functions you can find in it. Meanwhile, you can also do a lot of fun stuff by using it. For example, turning yourself into a cartoon character is available on this software. Moreover, unlike Photoshop, which is expensive and time-consuming, this image tool is totally free to use all the functions and easy enough for a 70-year-old to handle.


Use The Superimpose Function
The first solution I want to share is by using the superimpose function. It is a built-in option right in the “Edit Images”. There are more than fifteen different kinds of templates for users to pick from. For example, you can find effects like painting, wood, metal, heart, and even paper texture. You will find nine different overlay blending modes on the top of this page. Each one is very beautiful and practical. You can make it darker, or you can make it brighter. Of course, it also includes the most commonly used softening effect. You can find almost every kind of scene corresponds to the template and blending modes. Not to mention it allows you to adjust the overlay transparency however you want. So, in general, this is more than enough to satisfy the user’s need for overlay images.
🎀 Let’s take a look at how to use this function.
First, you need to download and install this amazing image tool on your computer so that you can operate all the image processes by yourself.
Second, open it and find “Superimpose” in the “Edit Image” section. Insert your desired photo and get ready to overlay the image.
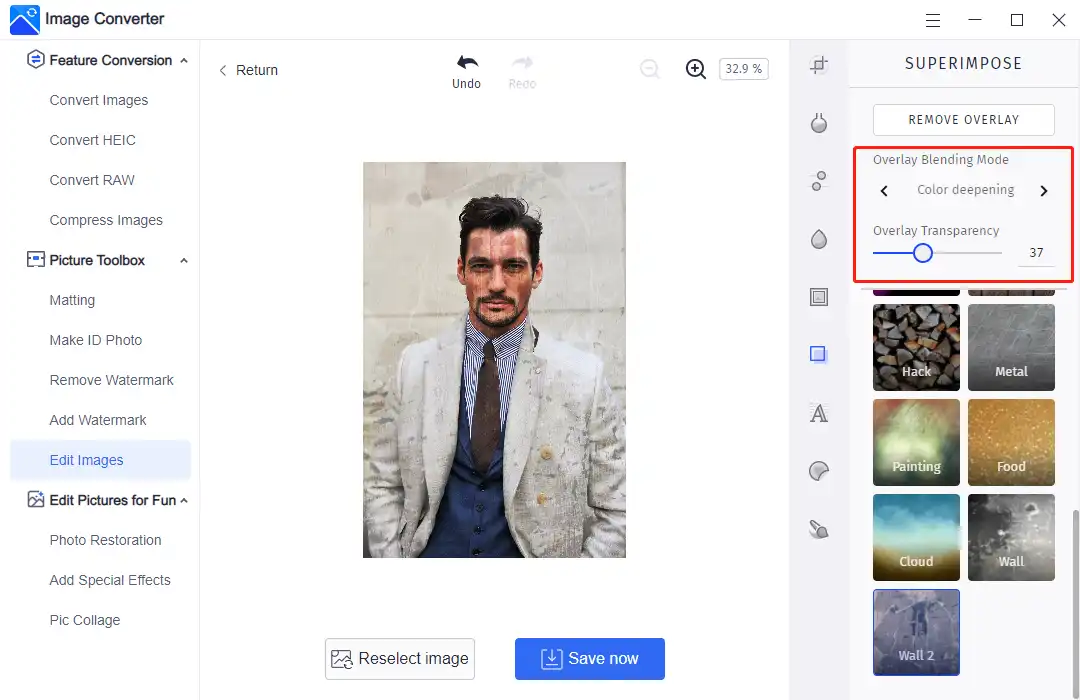
Then you will see over fifteen superimpose templates that you can apply. Pick one and adjust the “Blending Mode” and “Transparency“. Here I personally like to try the “Wall 2” template. In order to make the effect look more real. I turn the mode to “ordinary” and make the transparency level 28. I think this is what I want. So I can save the copy on my computer now.
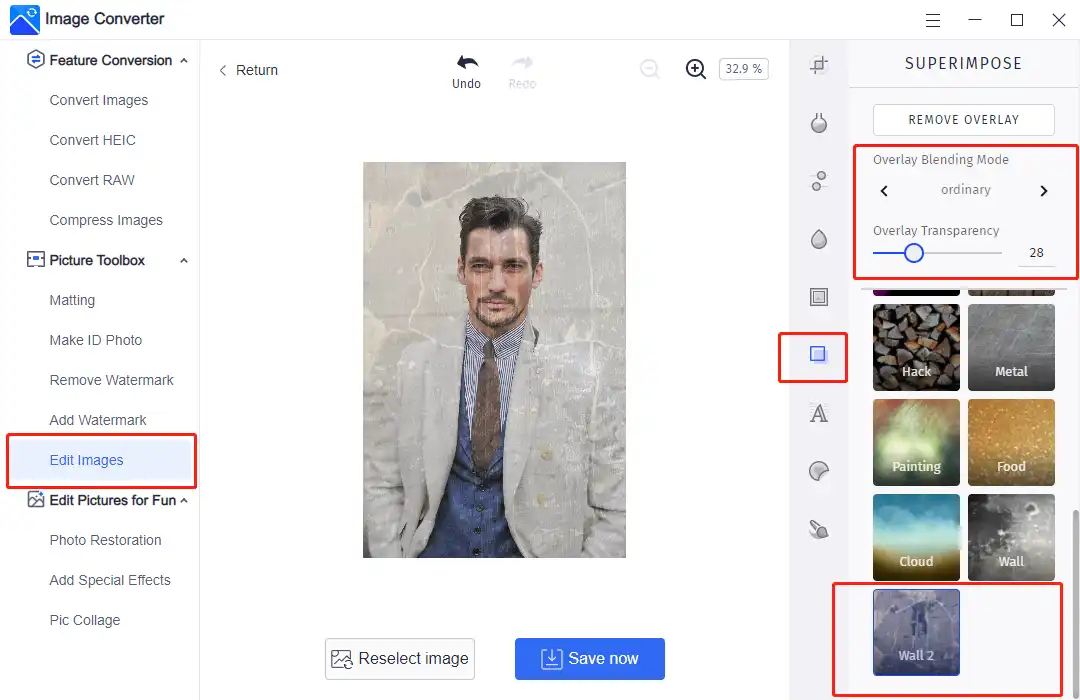
“Blending Mode” and “Transparency” can make a great impact on the final result. As you can see, even if I choose the same overlay template, simply change the blending mode and transparency level. The photo effect on the canvas is completely different from the original one.
Stickers work as Well
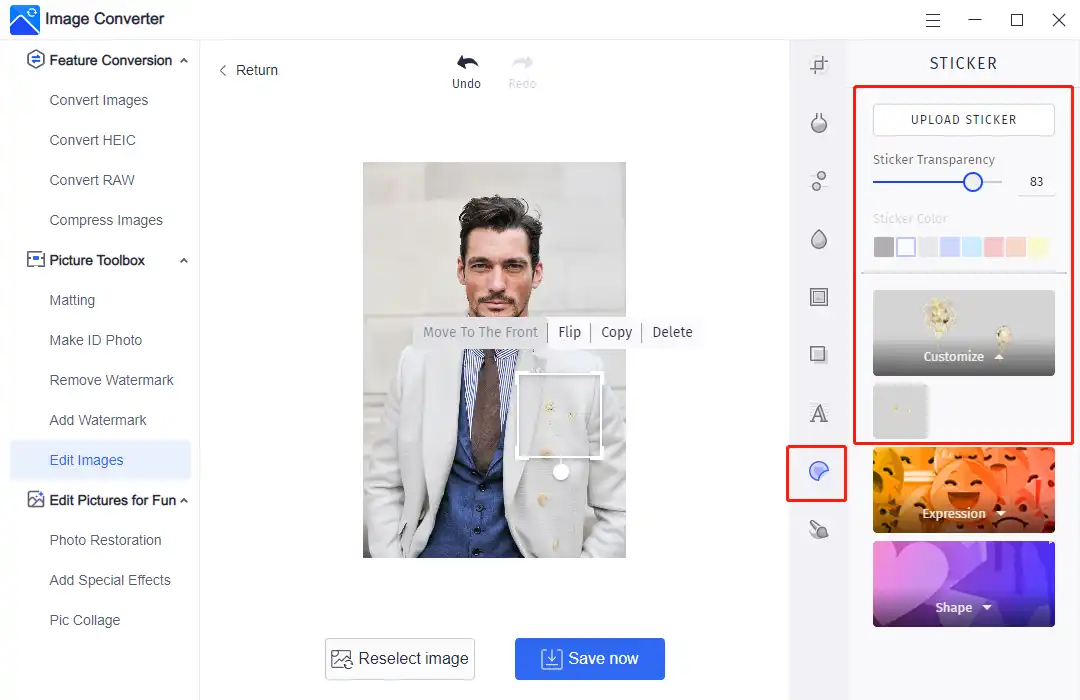
If you don’t want to use the pre-templates in this software. And you want to upload your own picture to overlay images. Maybe you can try this way – by using the Sticker function. Because at the beginning of the function development, in order to facilitate the user to understand the use of this image editing tool, the Photoshop mask function was not applied to this one and replaced with a Sticker function to add the already taken pictures.
🎊 For that, you need to remove the background of the overlaid picture first. Let me show you how it is done.
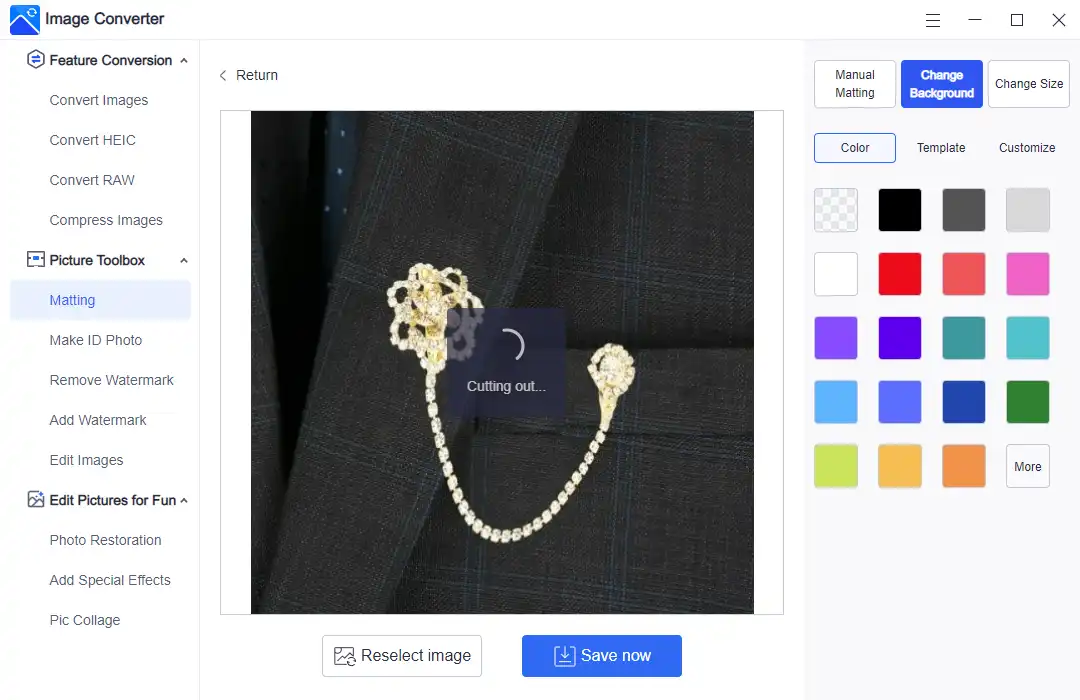
Step 1: Go to the “Matting” section and decide if you are cutting a person or an item. Normally, in this case, you don’t need to control it manually. The AI matting will do it for you, and the result is outstanding. However, if you want to do it yourself, change it to the Manual Matting section and cut it on your own. After cutting, save the processed picture to your computer for step 2.
Step 2: Then, same as before, go to “Edit Images” and insert the wanted photo. Here we select the “Sticker” function. You can see there is a button telling you that you can upload stickers from your computer. After putting the processed picture into this imaging software, you will see it under the box. Click it and move the picture on the canvas. You can flip, copy and delete it. Also, in order to make it look real, slight transparency can optimize the effect.
Step 3: After injecting and adjusting the sticker, you can save it on your computer for later posting. I think the processed image is just as good as it was in Photoshop.
Overlay Images by Matting
The third option is simpler than the other two. A picture made in a particular situation can also be made without holes. It is to use the matting function to replace the background. There are more than fifty different background templates for users to try. It ranges from natural scenery to beautiful sports cars. You drop your image into the cutout feature, which automatically snaps out the main part of the image, and then selects the appropriate background image for the effect you want. So you can finally get the desired picture just like that.
So let’s take a look at the production process.
Step 1 and Step 2 are the same as the Sticker way, open it and go to the matting section. Then insert the picture you want to overlay.
Then step 3 goes a separate way. When the AI matting is completed, find the “Change Background” option. There you will see three choices. Color is for users to replace the background with one type of color. Templates are preset images that you can directly apply to your photos. Or, if you have a better idea, go to the “Customize” button to upload your background.
Last, like others, after adjusting your picture, click “Save now” to keep it on your computer. Then you can use the processed image everywhere.

More to Share
These are the easiest solutions that you can overlay images by WorkinTool Image Converter. I hope you can have a good grounding in the basics of how to operate this. Unlike Photoshop, you can get the overlaid effect if you can master these three ways as fast as you can. More practice will make you a better image editor.


Related Article
 How to Convert Images to Text on Windows, Mac, and Online How to Optimize Images for Websites: Boost the Performance and SEO How to Create Diablo 4 Images like Lilith Using AI Image Generator