How to Blur a Picture for Free on Windows and iPhone
Eager to know how to blur a picture for free? In addition to taking crisp and clear images, many photographers like to apply the bokeh effect when shooting a photo. We also apply the blurry effect to hide someone or an embarrassing object in a picture. To blur out an image, whether for parts of a picture or the picture background, can be easily done in post-editing. This article explains how to create focus and artistic effect to a picture using the blur technique on Windows and iPhone. Both free and paid solutions are elaborated. Head further to learn more!
😎 300+ different models and styles
😆 Custom AI image generation available
😍 Various image generation results
😘 Provide Text-to-Image and Image-to-Image Generation
🥰 Easy and fast operation and generation
How to Blur a Picture for Free on Windows and iPhone
Every moment matters. Modern people would like to keep a running account of the good things in their personal lives using cameras and smartphones. Whether for work or personal use, it is meaningful to record life. However, we often end up with embarrassing or chaotic scenes unintentionally. In this case, we can blur out the unwanted parts. How do you blur something in a photo? Well, it is not rocket science. This post explains how to blur a picture for free using a free photo editor on Windows, the leading photo editing software Photoshop, and the built-in feature on iPhone.
In addition to covering up the unwanted scenes and faces, adding blurring effects to a picture can also add texture to pictures to reduce noise, avoid distraction, add motion, enrich focus on the main subject, create shadow depth of field, add style and create an artistic expression to a picture, and more. More than shooting crisp and clear photos, creating blurred images is another goal that photographers often pursue. Head further in this article to learn how to blur the background and parts of a picture like a professional photographer!
How to Blur a Picture with WorkinTool Image Converter
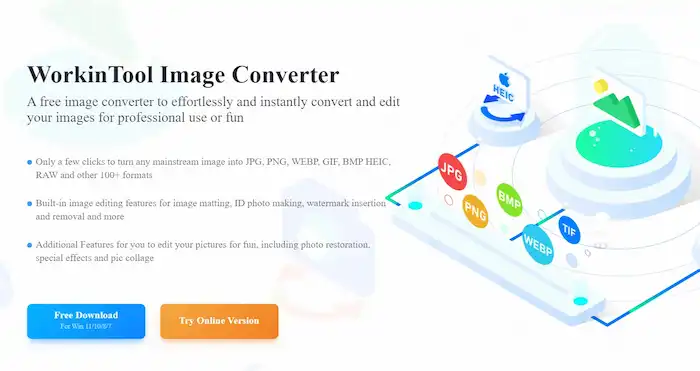

Blurring a picture can be effortless with a reliable desktop blur tool. WorkinTool Image Converter is a free Windows-based photo editing software embedded with versatile features. You can rest assured that all the features are free to use without registering or buying a membership. The four blurring modes built into it support you to blur a whole picture, blur the picture background, and blur parts of a picture with the adjustable amount and gradient. It is easy to add a blur effect, whether on objects, faces, backgrounds, or something else, using this photo editor.
Other than the blur tool, this software enables users to convert images to any format in bulk, edit photos like a pro, reduce picture size, make a picture collage, and so on. It avails users of various filters like gender swap, aging filter, and youth filter as well to create arresting pictures. With easy guides in the clean interface, users can make a stunning output in a few clicks. One thing that sets this image editor apart from the competition is it endows all features to users without a watermark. Eager to explore how to blur a picture using WorkinTool? Here is the step-by-step tutorial.
1. Blur the whole picture
- Open WorkinTool Image Converter and go to Picture Toolbox > Edit Images.
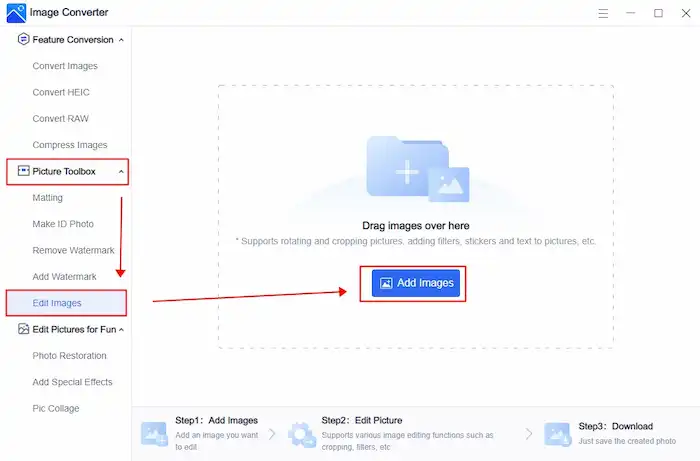
- Drag and drop or select an image to upload, then hit the droplet icon to choose the Gaussian Blur effect.
- Drag the slider to control blur intensity, then save the blurred picture.
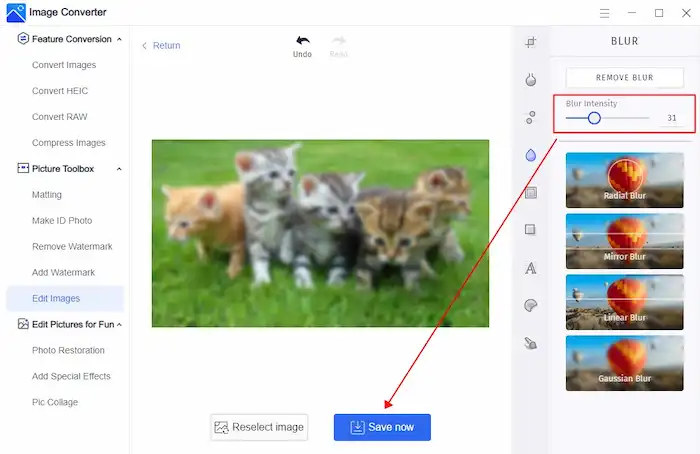
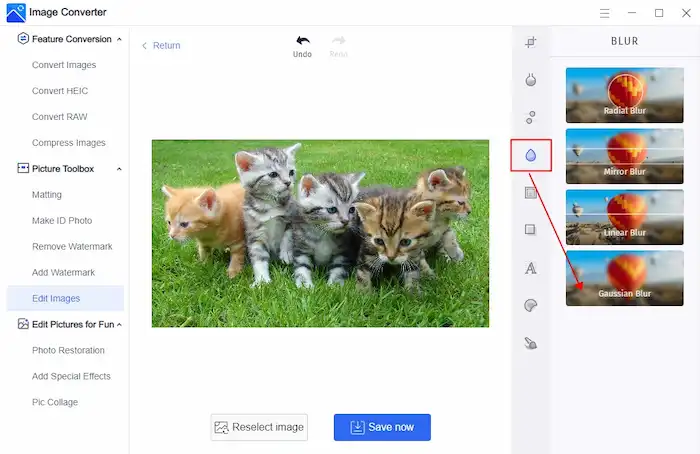
2. Blur the background or parts of a picture
After learning how to blur a picture completely using the Gaussian Blur mode, we can also use the rest three blur effects to blur the background of a picture and make parts of a picture blurry. Just repeat the first two steps and select a blurring mode as desired. The blurred area, angle, and intensity are alterable as well.
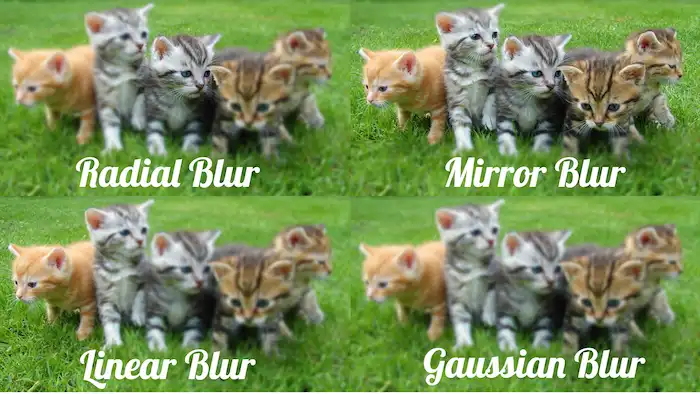
- Radial Blur: A gradual blur that radiates from the central point to make the subject stand out.
- Mirror Blur: Blur an image by two lines, with the middle remaining clear while the two sides are blurry.
- Linear Blur: Make a blurry effect by a line, with one side untouched but another foggy and smooth.
The Different Outcomes of the Four Blurring Effects
Add Blur to a Photo in Photoshop
When people talk about professional picture editing tools, the first name that comes into mind must be Adobe Photoshop. Compared with WorkinTool Image Converter, PS equips more features to achieve various possibilities. On the other side, however, people who are less experienced and search for an easy solution to blur out a picture will find Photoshop is beyond their skill level. If you have enough time and are willing to pay more patience, Photoshop will help you to create a dazzling blurring image by highlighting a strong focal point, adding movement to a static object, achieving a tilt-shift effect, and more. You can use Photoshop’s features with its 7-day free trial. Here is how to blur a picture using Adobe Photoshop.
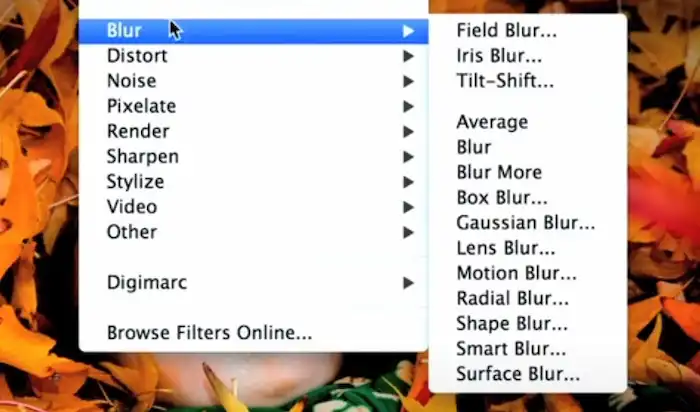
- Open an image in Photoshop and go to Filter > Blur Gallery.
- Select a blur effect and place it on your picture.
- Click and drag the points to resize the blur area and the blur transition area.
- Control the blur dial to adjust the blur intensity.
- Click OK at the top of the windows when finished.
You can use Radial Blur to highlight a strong focal point, apply Motion Blur to add movement to something, add Gaussian Blur to reduce noise and detail, and so on. In addition, you can also select the Blur tool on the left toolbar to apply a blur effect with a brush manually. You can adjust the brush tip and strength as well. It allows you to blur anywhere you want. It is easy to get an image fully blurred or part blurred in Photoshop.
How to Blur a Picture for Free on iPhone
It is easy to blur the background of a picture on an iPhone using the built-in Camera app. With the basic features in the Portrait mode, you can take and edit a picture with a blurry background. After shooting a photo, you can adjust the blur gradient by controlling the f value. The lower the f value, the higher the blur intensity of the image background. When taking a picture, an ideal f value is 2.8, which will give you a better bokeh effect. Here is how to blur the background of a picture with the Camera app on an iPhone.
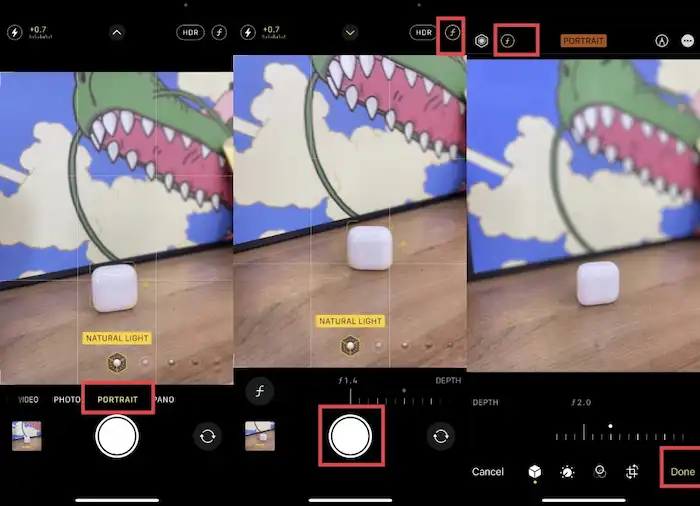
- Open the Camera app on your iPhone and swipe to Portrait mode.
- Adjust the distance between your subject and the camera lens.
- Tap on the f icon in the upper right corner to adjust the blur intensity.
- Press the shutter button to take a photo.
Bonus Tips
The backside of the Portrait mode in the iPhone camera is that it only allows you to add a bokeh effect. If you want to blur parts of a picture or make the whole picture blurry, you need to install a third-party app to acquire more blur effects. Picsart is professional, allowing you to blur the whole image and add radial blur, focal zoom, lens blur, and other blur effects to photos. Although Picsart charges for some filters, you can try its free effects and features as well.
Wrapping up
Here is the end of this article. We explain how to blur a picture for free on Windows using WorkinTool Image Converter and on iPhone Camera. Other solutions with in-app purchases, like Photoshop and Picsart are also included. Now, find the approach that suits you most and begin your editing journey!


Related Article
 How to Blur Faces in a Photo for Privacy Protection [Four FREE Solutions] How to Compress a JPEG on Windows/Mac/iPhone How to Compress a PNG Image Free on Windows/Mac/iPhone