How to Replace Audio in Video on Windows, Mac, and Online
If you’re unsatisfied with the background music or the original voice in a video, replacing it with a new audio track is easy. A simple change will improve your video performance to a new level. This post shares three free video editors to replace audio in a video on different operating systems. Read on to learn their features and how to use them!
How to Replace Audio in Video on Windows, Mac, and Online
Audio is an indispensable part when creating videos. If you don’t like the original voice in a video and want to replace it, or you feel the background music does not match with the video mood, you need to replace the audio in a video to improve video quality, set the mood, and evoke the viewers’ feelings. It is easy to change the audio track in a video or mute a video. This post is going to share how to replace audio in video on different platforms, including Windows, Mac, and online.
Separating audio from video and adding a new audio track to a video are two basic video editing techniques. Most video editors, like VidClipper, iMovie, and Clideo, come with audio editing features. If you are unfamiliar with audio replacing, the content below will show you detailed steps to remove the original audio track and add a new track to a video. You don’t need to pay for these video editing software because all of them are FREE to use. Read on to learn more!
How to Replace Audio in Video on Windows
In fact, there are pre-installed tools like Microsoft Photos and VLC Media Player that you can utilize for free on Windows. But they can only meet your basic needs to edit a video. For more professional, comprehensive, and advanced video editing techniques, it is essential to install an all-in-one and easy-to-use video editor like WorkinTool VidClipper.
This free video editing software packs versatile features into a straightforward interface. You can easily extract audio from video, add music to video, and replace an audio track using this tool. Unlike sophisticated video editors like Premiere Pro and After Effects, VidClipper is user-friendly to everyone, including video editing beginners. So you don’t need to pay much energy on a steep learning curve.
Here are the detailed features in use. You just need to separate and delete the original audio track from the video, add a new background music track, and export the final work. Easy three steps will give you a high-quality and watermark-free video in seconds.
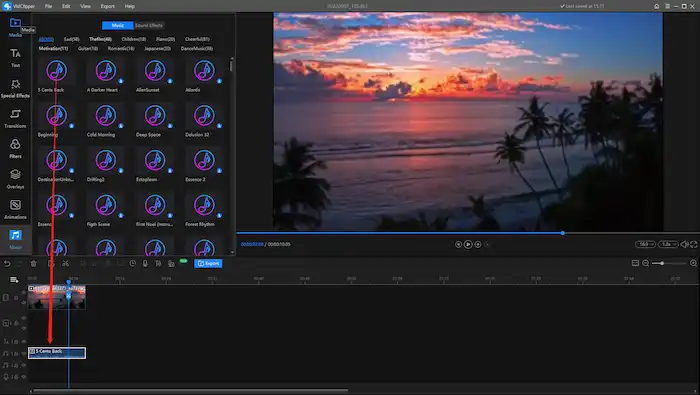
Step 1: Separate the Original Audio Track.

After installing, open this video editor and click New Project on the main page to enter the video editing panel. You can drag and drop your target video and audio materials to the Media interface. Then, find the video track in the timeline, and drag the target video there.
Right-click the video on the timeline, and you will see a quick edit menu. Select Split A_V in the menu, and you will see the background audio is separated and placed independently on the audio track. Right-click the separated audio and press Delete. If you want to save the original music as a copy, you can select Voice Extract to keep a copy when you right-click on it.
Step 2: Add a New Background Music.
It is time to add new background music to your video. To replace audio in video, you need to prepare a new audio sample. Just like the steps above, drag and drop your music material to Media, drag it to the audio track in the timeline, and adjust its length to match the video. Or you can choose audio from the music stock in VidClipper. You can use 300+ music and sound effects without costing a penny.
Step 3: Export the Final Work.
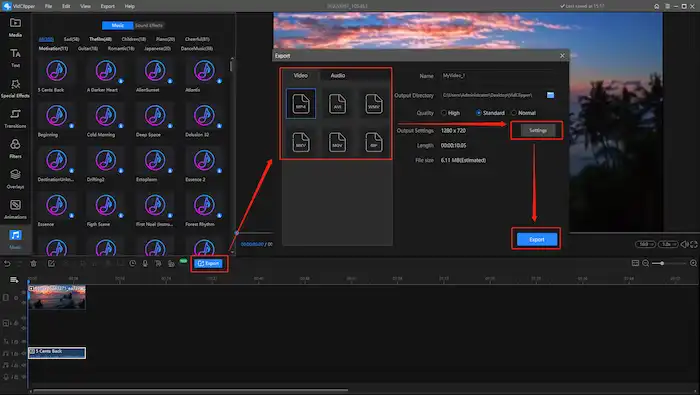
You can make further edits to fine-tune your video to a new level, such as adding keyframes to a video, adding text and subtitles to a video, reversing a video, and so on. After editing, press the blue Export button to save your work. There are different video formats you can choose from, like MP4 AVI, MOV, WMV, and MKV. Apart from that, the video quality is adjustable. You can manually change the resolution, bitrate, frame rate, and things like that. Just press Export to save the video.
How to Change Audio in Video on Mac
Mac users will be glad because iMovie is excellent enough for processing basic video editing tasks. The built-in video editing software on macOS also has advanced video and audio editing features. You can trim a video, put a picture in a video, and add a video overlay.
When you want to replace audio in video, it is convenient to choose local music from your library or record your voice. Follow the steps below to remove the background music from a video and add a new audio track.
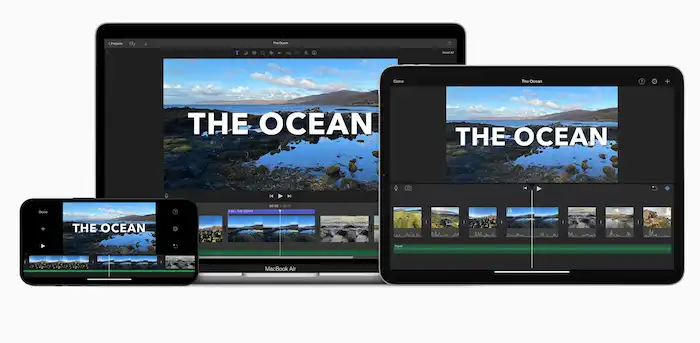
Step 1: Create a Project in iMovie.
Launch the iMovie app on your computer and go to Projects > Create New. Then, import the target video from your computer to this app and add it to the timeline.
Step 2: Detele the Original Audio.
Right-click the video you add to the timeline. Then select Detach Audio from the pop-up menu to separate the audio track and delete it. Or you can select the video and click the speaker icon in the toolbar to mute the audio.
Step 3: Add a New Audio Track.
After deleting or muting the sound, you can add new background music and match it with the video. Export the edited video when all the work is done.
Notice
The default Photos app doesn’t have an audio editing option that supports iPhone users to change the video background music. But you can make use of iMovie as well. It is attainable on both macOS and iOS. And the operation steps do not differ much.
How to Replace Audio in Video Online
Online video editors enable you to replace video background music anywhere using any device. Compared with the last two video editing software, Clideo’s Add Music to Video tool is only limited to BGM changing. If you want to make further edits, you need to hop over different web pages. But it is indeed the simplest way, enabling you to change audio in a video in seconds on any device anywhere. All you need is a stable network. Here are detailed music-changing steps.
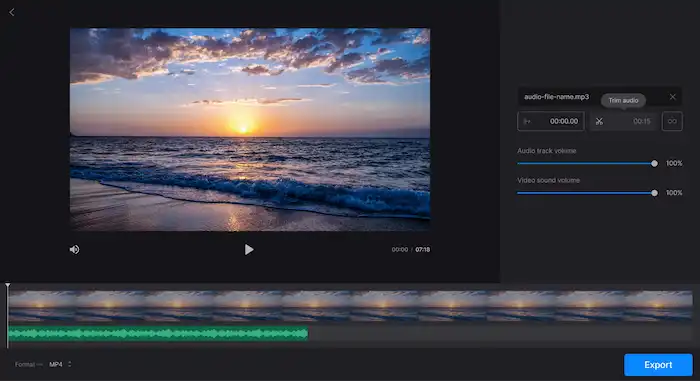
- Go to Clideo’s Add Music to Video tool and Press Choose file to upload a video.
- Click Add audio to upload an audio file. Then you will see two options. Drag the slider to drop the video sound volume to 0% and adjust the audio track volume as you like.
- Click Export to download the edited video to your local devices.
But one shortcoming is that a brand watermark will cover the final work you export from Clideo. To erase the watermark, you need to pay at least $6 per month or use a watermark remover to get rid of it.
Conclusion
Changing video audio is not rocket science. It just takes you a few seconds to do that. And you will get worthy feedback. What you’re eating for? Just select one solution to improve your video performance right now!