Quick Start Guide: How to Convert RAW to JPEG
In the realm of digital photography, RAW and JPEG are the two primary image formats, each with its own set of benefits. 💪Learning how to convert RAW to JPEG is essential for optimizing your photography workflow and maximizing the potential of your images. 😎This article will provide a detailed explanation to help you easily navigate the world of digital imaging.
Quick Start Guide: How to Convert RAW to JPEG
RAW, which stands for “raw, unprocessed,” refers to the original data captured by a camera in photography. It is like a digital negative, containing a wealth of detail. However, it is not a universal format, and many devices have difficulty reading it directly. To make viewing and editing easier, format conversion is necessary. Do you know how to convert RAW to JPEG❔ Keep reading❕
🔎 RAW Format: The Original Code of Digital Imaging
The RAW format is a collection of raw data captured by a camera’s sensor, essentially an unprocessed “digital negative.” Unlike formats that directly record visible images, RAW files contain three core elements: sensor raw data, metadata information, and thumbnail previews. Different manufacturers use proprietary extensions but adhere to open standards. The core value of RAW lies in its high color depth, which provides ample room for post-adjustment and can record brightness levels far exceeding those of conventional formats, offering immense potential for post-processing.
💡 The Importance of Converting RAW to JPEG
| Dimension | RAW Format Characteristics | JPEG Format Advantages | Typical Application Scenarios |
| Storage Management | Contains unprocessed raw image data, typically with large file sizes | Adopts lossy compression algorithms to effectively reduce file sizes | Hierarchical storage management of long-term image archives to save storage space |
| Transmission Efficiency | Large files transmit slowly over networks, affecting timeliness | Compressed files are smaller, significantly improving transmission efficiency and reducing transmission time | Instant image preview in remote collaboration for quick sharing of image content |
| Device Compatibility | Generally requires specific software to decode and view, limiting device compatibility | Conforms to universal standards and is directly supported by most devices for display | Image viewing and sharing on various general-purpose devices (e.g., smartphones, ordinary computers) |
| Creative Workflow | Offers immense post-adjustment space but can be inefficient during image selection due to large file sizes and slow loading | Enables quick previews for easy screening while retaining RAW files for in-depth adjustments | Preliminary screening in photography creation and fine post-retouching |
| Image Quality | Preserves rich details and dynamic range, providing great flexibility for post-processing | Loses some image details after compression but makes files more manageable with reasonable compression | Professional photography requiring high image quality and complete retention of original data for high-quality post-processing |
🔑 Effective Method to Convert RAW to JPEG
✅ ImageConverter
ImageConverter is a software tool that excels at batch image format conversion, supporting a wide range of formats including JPG, BMP, PNG, WEBP, HEIC, and RAW. It is equipped with various editing features that empower you to craft impressive images with ease.

📝Step-by-Step Conversion Process:
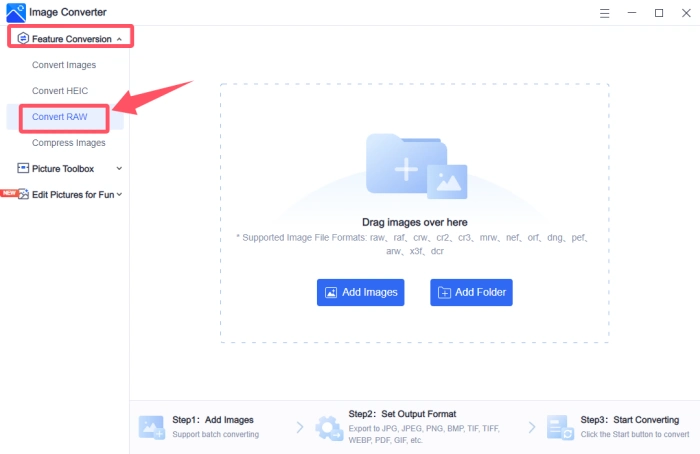
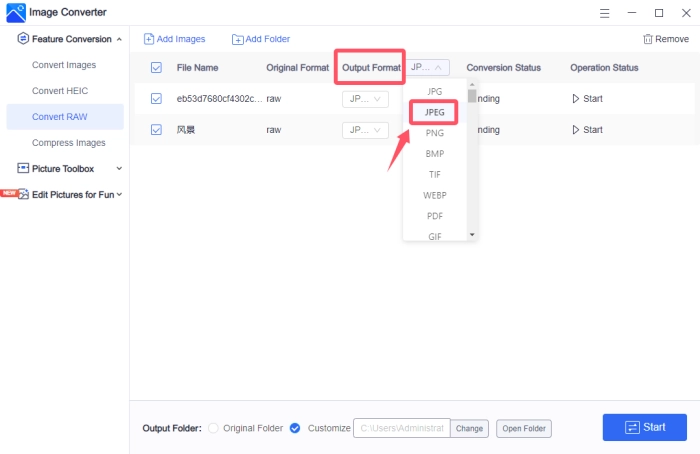
1, Select “Convert RAW” from the “Feature Conversion” dropdown on the left.
2, Import your files; multiple selections are allowed and will convert to “JPG” by default.
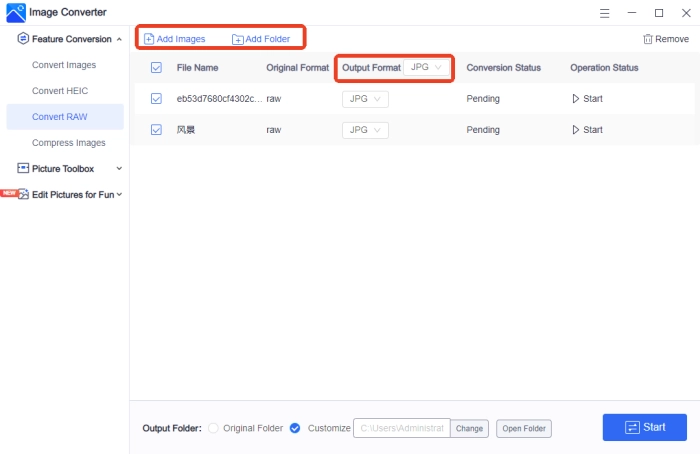
3, Choose “JPEG” in the “Output Format” section.
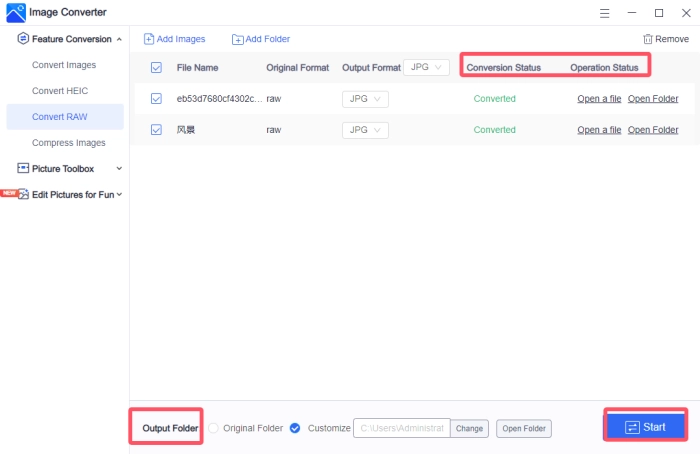
4, Set your output directory and click “Start.” The process ends when “Converted” appears.
📣 Essential Settings for RAW to JPEG Conversion
🔸 Control Image Quality Parameters
| The export quality setting for JPEGs is key for file size and image quality, often shown as a percentage. Higher quality means larger files but more detail; lower quality reduces size but may add artifacts. Adjust based on your needs, like printing or web use. For online sharing, a lower quality might suffice. |
🔸 Select Color Space Type
| The color space affects the color range an image can show. sRGB is standard for the web and most displays, ensuring broad compatibility. Adobe RGB offers a wider range, suitable for professional printing. Choose sRGB for online sharing; consider Adobe RGB for professional printing if supported. |
🔸 Adjust Resolution and Size
| Adjusting resolution and size is crucial based on the JPEG’s intended use. For web or social media, lower resolution is often enough; reducing size can improve load times and save bandwidth. For prints, sufficient resolution is necessary for quality. Set dimensions according to your platform’s needs. |
🔸 Handle Image Metadata
| Metadata includes details like camera model, lens, and GPS location. When exporting JPEGs, you can choose to keep or remove this info. Keeping it is good for traceability, but removing it can protect privacy or reduce file size. Choose based on your needs and the platform’s requirements. |
✨ Q&A on Converting RAW to JPEG
1️⃣Q: How can I avoid image quality loss during the conversion process?
A:
◽ Adjust parameters before conversion: Fine-tune relevant settings beforehand to prevent poor image quality from direct conversion.
◽ Choose high-quality export: Opt for “maximum quality” to minimize compression artifacts.
◽ Retain the original file: Keep a backup of the RAW file for future edits.
◽ Avoid multiple edits: Make all adjustments in one session to prevent repeated compression from degrading image quality.
2️⃣Q: How do I choose the resolution and size when converting?
A: It depends on the intended use.
◾ Social media: Use 1080p (1920×1080) for quick loading.
◾ Web display: Opt for lower resolution to speed up loading.
◾ Printed images: At 300dpi, an A4 size image is approximately 3500×2500 pixels.
◾ Archival backup: Keep the original resolution from the camera.
3️⃣Q: How will the conversion from RAW to JPEG affect the sharpness of the photo?
A: During conversion, adjust sharpness based on the photo’s content. Too much sharpness can make the image harsh and noisy, while too little can make it look blurry.
4️⃣Q: How can I easily determine if the image quality after conversion is up to standard?
A: Check for noticeable blurriness, increased noise, or color banding. Also, inspect details like texture clarity. If there are no major issues, the image quality is likely acceptable.
5️⃣Q: How can I retain the dynamic range of the photo to the greatest extent during the RAW to JPEG conversion process?
A: Adjust the recovery strength of highlights and shadows in the conversion settings to avoid excessive compression and detail loss. Also, moderately adjust contrast to maintain the dynamic range.
👀 More to share
In conclusion, RAW and JPEG each play their unique roles and complement each other in the field of photography, jointly constructing a complete ecosystem for photographic image processing. 🌈Learning how to convert RAW to JPEG can not only enhance your work efficiency but also optimize the quality of your works, allowing images to exhibit stronger expressiveness and higher viewability. 👍ImageConverter, as a user-friendly and feature-rich image processing software, undoubtedly provides strong support for image format conversion, helping you more efficiently complete the transformation from raw materials to finished products.


Related Article
 How to Edit PNG Image: 4 Easy Methods for Quick Results
  [Four FREE Solutions] How to Compress a JPEG on Windows/Mac/iPhone
  How to Edit a JPEG Image: 4 Essential Tips for Beginners