How to Make a Velocity Edit for Free | 2 Easy Solutions
Velocity videos go viral on video sharing websites such as TikTok and YouTube. Learning how to make a velocity edit now to catch up with the trend! This post explains the necessary skills to speed up, slow down, add transitions, flashes, and other effects that you need to make stunning velocity videos. Two freeware, including a Windows-based video editor and a mobile video editing app, are elaborated. Head further to know more!
How to Make a Velocity Edit for Free | 2 Easy Solutions
Want to make videos more vigorous and engaging? Try velocity edits! Adding a velocity effect to a video will enhance its movement and improve the dynamic effect to a new level. If you are searching for apps or software to control video speed, here is the right place. This post will explain what a velocity edit is and how to make a velocity edit for free using WorkinTool VidClipper and CapCut. After reading, you will know their features and highlights in detail and can select one according to your tastes.
What is a Velocity Edit?
You must have seen some velocity videos on TikTok or other video media. Velocity edit has recently become a trend. In fact, it is a practical video editing technique that can enhance video movement by speeding up or slowing down the video playback speed at certain seconds. Other than that, some experienced video editors will add elements like transitions, flash, and sound effects to make videos more eye-catching and engaging. With this skill, you can easily create impressive videos to attract viewers and catch up on the latest TikTok and YouTube trends.
How to Make a Velocity Edit with WorkinTool
WorkinTool VidClipper is a practical video editor that lets you easily control the video playback speed and add special effects to videos. The highlight is that you don’t need to register or pay for a license. All the functions are free to use. Unlike Premiere Pro, which is powerful but too sophisticated for beginners, WorkinTool labels each feature clearly, with no advanced features hidden deep in the dropdown list. The simple interface and clearly-labeled functions make this video editing software easy to use for everyone.
It offers tons of editing features you need to create velocity videos, such as extracting audio from video, controlling playback speed, adding video transitions and special effects, splitting videos, adding music to Instagram post, etc. Here is how to make a velocity edit with WorkinTool VidClipper’s free features.
Step 1: Create a new project in WorkinTool
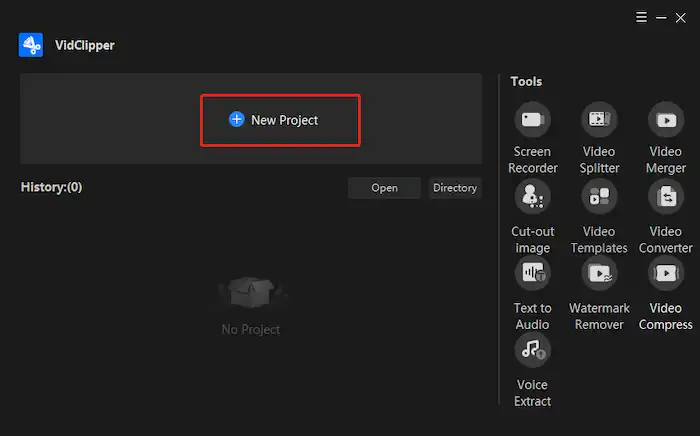
Open WorkinTool VidClipper and click on New Project to enter the editing panel. You can directly drag videos, images, audio, and other materials here. Then, drag the video you want to make a velocity edit for to the timeline.
Step 2: Separate music from video
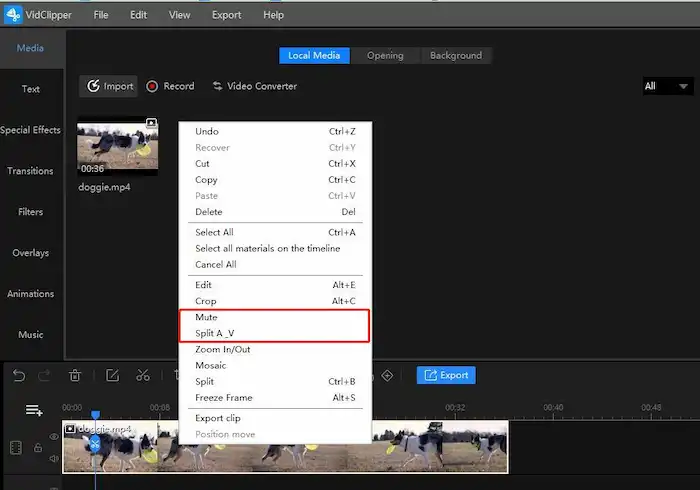
Right-click on the video you have placed on the timeline. There are two options available. You can directly mute this video with the Mute button or extract audio from this video by selecting Split A_V.
Step 3: Split the video into clips
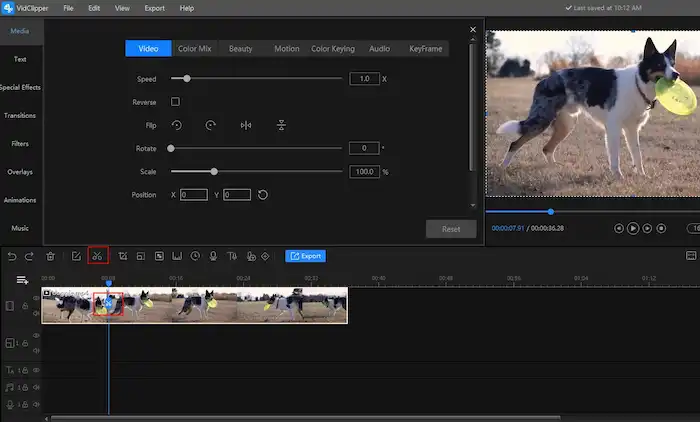
Drag to move the playhead and stop where you want to make a velocity effect. Click the scissor icon on the playhead or use Ctrl+B to split the video.
Step 4: Make velocity edits
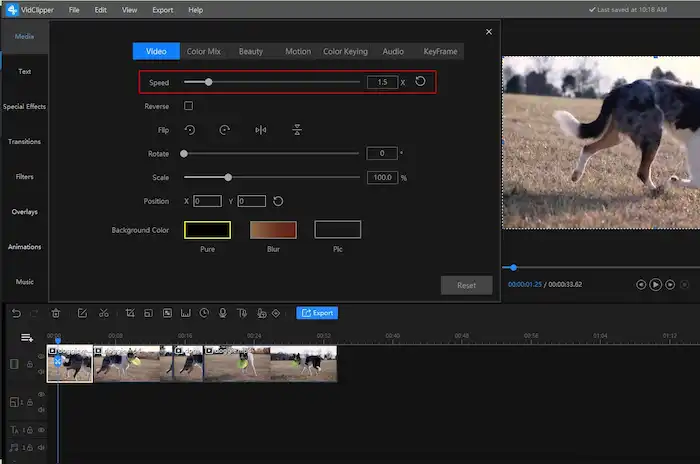
After the video is split into pieces, select different video clips to speed up or slow down. You just need to click the video clip to beckon the editing pop-up. Then, click on the Video menu and move the speed slider or enter parameters to control the playback speed.
Step 5: Enhance the effect
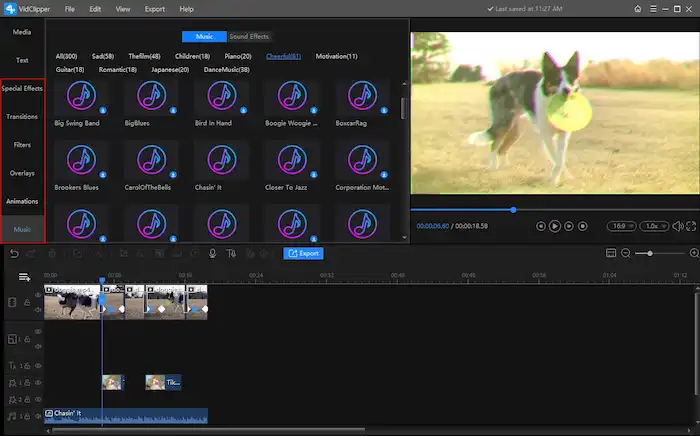
After adjusting the playback speed, you can add flashes, keyframes, transitions, filters, sound effects, and music to enhance the velocity effect. Click on the video clips, find the Motion menu, then you can make a velocity edit with flash. In addition, on the left toolbar, there are plenty of tools attainable, from special effects, transitions, and filters, to animations and sound effects. Try them by dragging them to the timeline, and you will get an unexpected outcome.
Here I add three keyframes to scale the image (view how to add keyframes here) and three transitions to make the speed change smoother. TikTok style filters are also added to enhance the final effect. Finally, select music from WorkinTool stock content or upload your music to this video editor, and the velocity edit is finished.
Step 6: Export your video
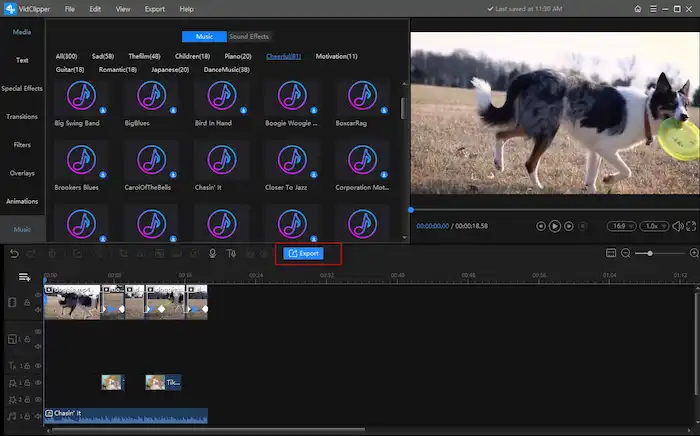
After editing, press the blue Export button to save the velocity video to your computer. (Your video will be automatically saved during editing. So you don’t need to worry about an accidental crash or something.) Six output formats are available, including MP4, MKV, MOV, WMV, AVI, and GIF. You can also configure the video resolution, bitrate, frame rate, and more.
How to Make a Velocity Edit on CapCut
You can also make a velocity edit on CapCut on mobile phones. CapCut is a video editing app compatible with both Android and iOS. Similar to WorkinTool VidClipper, it also gains much popularity for its easy-to-use and practical features. It is easy to trim, split, reverse, speed up, and slow down videos. Packed with various special effects, filters, transitions, and background music, it can help you to create smooth velocity videos with ease.
CapCut offers two modes for velocity edits—Normal and Curve. The first mode allows you to edit the video speed as a whole. While the “curve” mode empowers you to get a velocity effect creatively. Keep reading and find out how to make a velocity edit on CapCut using a mobile phone.
Step 1: Create a new project in CapCut
Launch the CapCut app and tap on New Project to select a video from your gallery. Then click on Add to import it to the timeline, and click on the video to activate the editing menu.
Step 2: Make velocity edits
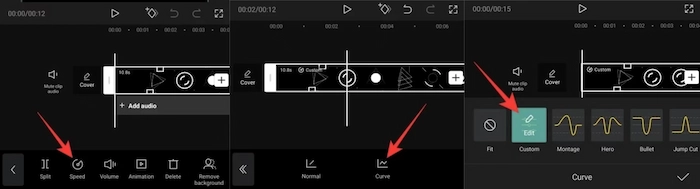
Click on Audio to reduce the volume to zero first. Tap on Speed, and you will see two options—Normal or Curve. The first one only allows you to speed up or slow down the video as a whole. So we need to tap on Curve to customize the playback speed.
There are six presets available, like Montage, Hero, Flash in, Flash out, etc. Or you can click Custom to control the beats manually. Five beats will appear, allowing you to adjust the video speed in different periods by dragging the beat point upward, downward, to the left, or to the right. Apart from that, you can add and delete beats as you want by pressing the Add beat or Delete beat.
Step 3: Apply the effect
Wrapping up
Velocity edits make videos more engaging. Learning how to make a velocity edit will help you to create more stunning and smooth videos to attract audiences. This article explains two free ways to do that. You can use WorkinTool VidClipper to control the playback speed and add special effects to videos in detail on Windows with ease. While CapCut allows you to edit velocity video using presets in a creative manner. Which one do you prefer?


Related Article
 How to Improve Video Quality on Windows | Easy Solutions
  How to Make an SRT File for Videos on PC | Easy Ways 2024 How to Make a Reaction Video on YouTube in 2024 [Easy]