How to Compress Images on iPhone/Android/Mac/Windows
Compressing images has almost become one of the essential skills in people’s daily life or work. Whether you want to quickly upload image files, send a large number of images to others through email, or save device storage space, we all need to reduce the size of the images. So how to compress images? This article introduces four methods for compressing images, which are applicable to different devices. WorkinTool File Compressor can meet the needs of both Windows and Mac users. Give it a try!
How to Compress Images on iPhone/Android/Mac/Windows
Nowadays, most people enjoy sharing their photos on social media, such as images of landscapes, selfies, pets, or children. Images are undoubtedly the most significant carrier for people’s communication and sharing, whether a picture of their cute dog, extraordinary scenery, a selfie, or a family union. To guarantee the successful upload of images, people must learn how to compress images before putting them on social media applications because many websites or apps have limited the uploading image size.
This post provides four ways to reduce image file size on Mac, Windows, Android, and iPhone. Please read it and choose one according to your needs.
How to Compress Images on iPhone?
Resize Image is specifically designed to compress images without any additional features. You can choose the image clarity yourself, upload and compress multiple photos simultaneously, and the compression speed is very fast. You can also change the image format while compressing it and preview the compression effect. In addition, it is free software and does not have advertising pop-up windows or watermarks.
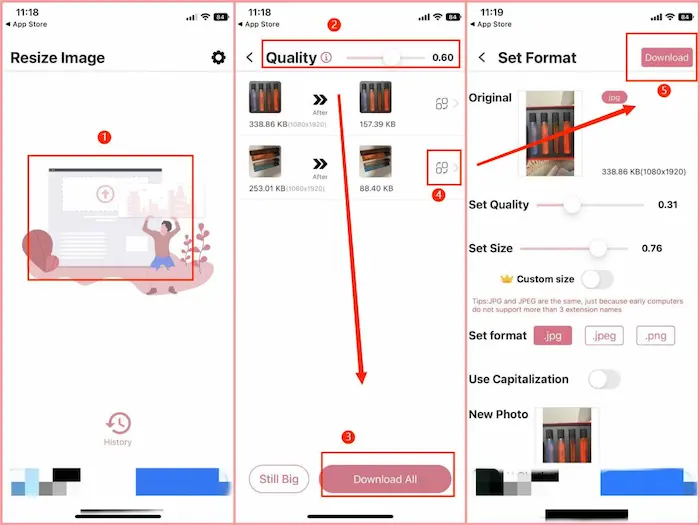
Process for Reducing Photo Size:
Step 1. Click the center of the page to import your images.
Step 2. Set Quality and click Download All.
Step 3. If you want to adjust the size of a single file, click the change button next to the file, set your target parameters, then click Download.
How to Reduce Image File Size on Android?
Mobile software stores usually have a plethora of compression software with mixed reviews. I have selected a simple and stable image compression software – Image Compressor, from numerous software options. It is a simple image compression app. You only need to import a file and enter a specific number. Your image will be compressed to a size similar to the number you entered. And it is so fast that it only takes you one second.
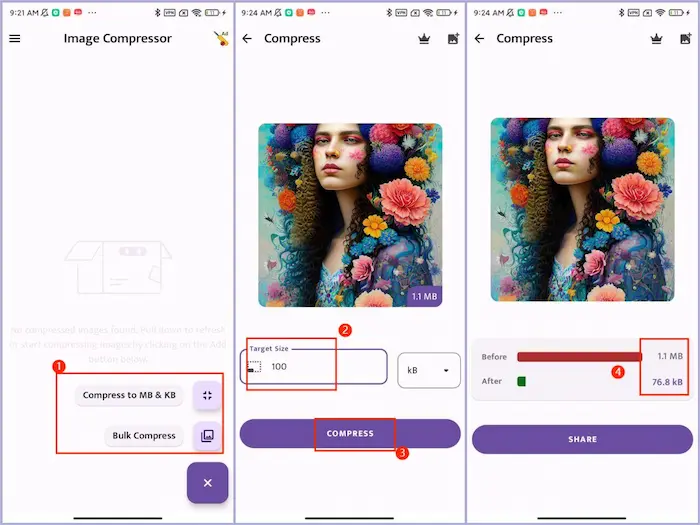
Ways to Shrink Photos:
Step 1. Open it on your phone and click the button below to select a compression mode. You can compress images one by one with a specific size or compress more than one image together.
Step 2. Enter the target size number, then click COMPRESS.
Step 3. You can see the compressed size after compressing.
How to Reduce File Size on a Mac?
After thoroughly comparing the image compressors on the internet, the first method I want to share with you to compress images is to use third-party software – WorkinTool File Compressor. It is a newly published all-in-one compression software. It supports multiple popular image formats like JPG, PNG, GIF, and BMP. Furthermore, it is 100% free for Mac users without any limits.
It provides two different modes for users to compress images. For example, if you are a rookie at compressing pictures and don’t know what level of compression is appropriate for uploading to the platform. Well, that wouldn’t be a problem because this tool can help you directly set a basic compressing level, automatically reducing the image size to a proper level. In addition, if you know the exact size, enter a specific size in the Additional Settings, and your file will be compressed to that size. Its compression speed is very fast, and there will be no advertisements, only a clean and tidy interface from beginning to end. Images saved after compression will not be automatically watermarked.
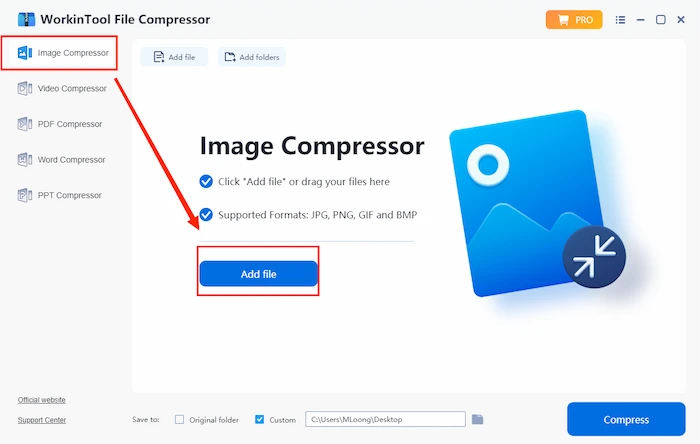
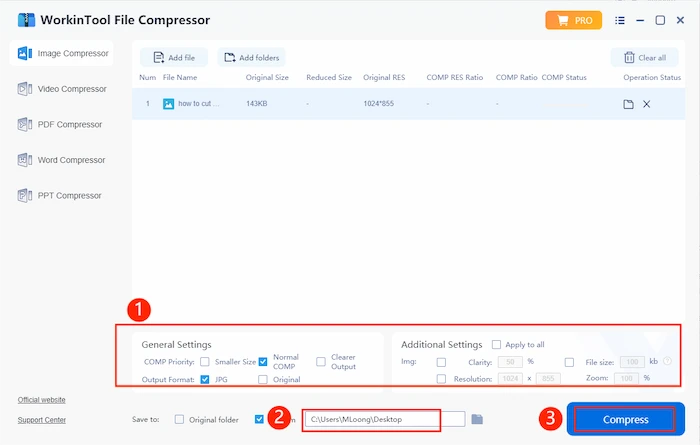
Steps on How to Compress Images:
Step 1. Download and open WorkinTool File Compressor on your Mac, find Image Compressor, and import your file. You can click on Add file or drag the file to it.
Step 2. Adjust the parameters in General Settings or Additional Settings. Select the file folder, then click Compress.
How to Compress Images on Windows?
In fact, you can still compress images with WorkinTool File Compressor on Windows. It provides a long-term free trial for Windows users to compress images within 200 KB. But I want to introduce another image compressor for Windows. Caesium Image Compressor is a popular image optimization software that helps users store, send, and share digital images. You can only compress images on it. But it is easy to use with a simple and straightforward interface. It allows you to compress up to 90% without visible quality loss.
Guide to Using Caesium to Shrink Images:
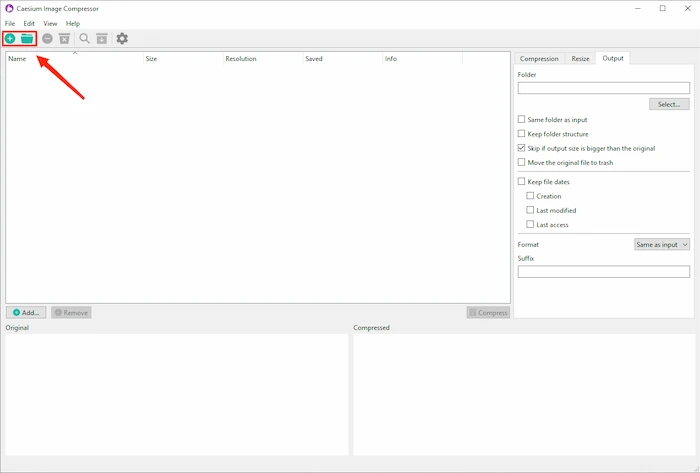
Step 1. Download and open it, then import your image files. You can click the + button to import an image or the file button to import a folder.
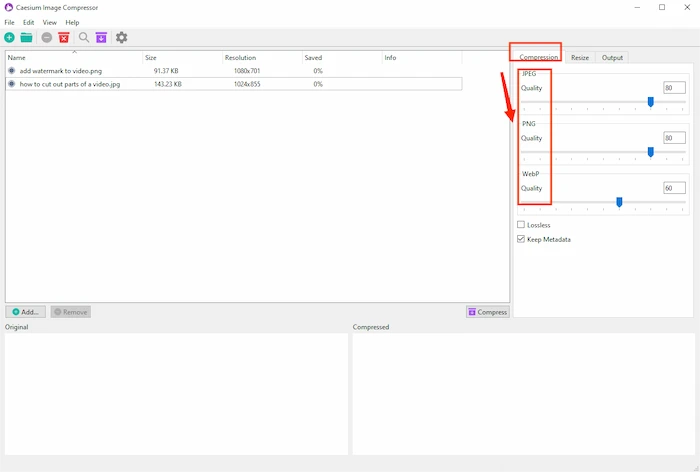
Step 2. Find Compression and set the Quality. Pay attention to the file format of your images.
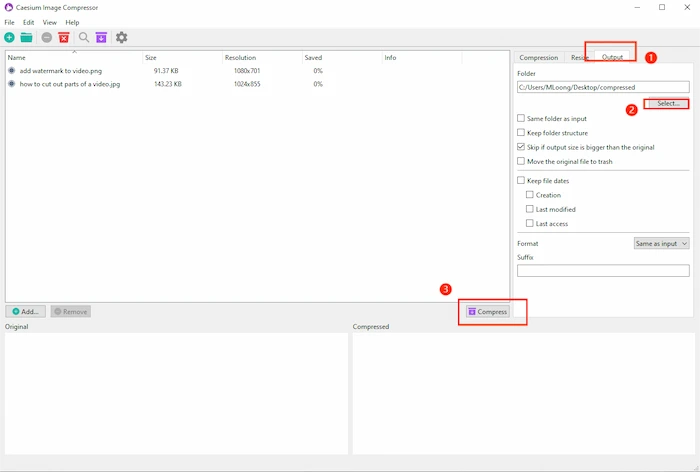
Step 3. Find Output and select the file folder where you want to save your compressed images. You can pick other settings if needed, then click Compress.
FAQs
How do I compress a JPEG without losing quality?
If you need to compress your JPEG file on Windows or Mac, try WorkinTool File Compressor. It supports compressing JPEG without any quality loss. Download and open it on your computer, select Image Compressor, import your file, set the compression mode, and then click Compress.
How do I reduce the MB size of a photo?
You can try the Image Compressor on your Android to reduce the MB size of the photo. Select Compress to MB & KB, enter your target KB size, then click Compress.
More Related Questions
Conclusion
To solve the problem of how to compress images, the first step is to choose a user-friendly image compression software. There are various software for compressing images, and it is difficult to pick the best among them. The four products introduced to you today are all considered the best ones to use on different platforms. They are all easy to start with, with a simple interface and operation, without annoying advertisements, and without automatically adding watermarks when outputting images. So, according to your needs, pick one as your daily routine.