How to Record a PowerPoint Presentation [Video and Audio]
Presentations often contain the most important information related to a topic discussed by a presenter. He or she uses these slides as talking points to make an argument or initiate a discussion. However, the implications of different points can be unclear without a detailed explanation. Unfortunately, attending a presentation that you need to give isn’t always feasible, which can make it challenging to shed light on each point you intend to make. Thankfully, recording a PowerPoint presentation is a simple solution to this problem. Doing so allows you to guide your audience through each slide without leaving the comfort of your home. In this article, we will show you how to record a PowerPoint presentation with both audio and video.
💡Without an Additional Tool–PowerPoint Built-in Recorder
💡With an Additional Tool: Windows–WorkinTool VidClipper, Mac–QuickTime Player, Online–FlexClip
Please feel free to try all the aforementioned solutions based on your needs and pinpoint an ideal one. If your computer OS is Windows, please take a closer look at WorkinTool VidClipper since it is user-friendly, easy to use and super multi-functional.
📢Now, please start your reading to learn about specific solutions and experience them by yourself.
How to Record a PowerPoint Presentation with Video and Audio | 4 Ways
Presentations often contain the most important information related to a topic discussed by a presenter. He or she uses these slides as talking points to make an argument or initiate a discussion. However, the implications of different points can be unclear without a detailed explanation. Unfortunately, attending a presentation that you need to give isn’t always feasible, which can make it challenging to shed light on each point you intend to make. Thankfully, recording a PowerPoint presentation is a simple solution to this problem. Doing so allows you to guide your audience through each slide without leaving the comfort of your home. In this article, we will show you how to record a PowerPoint presentation with both audio and video.
| 🎬Without an Additional Tool | 📍PowerPoint Built-in Recorder | |
| 🎬With an Additional Tool | 💻Windows | 📍WorkinTool VidClipper [🔥Recommended] |
| 💻Mac | 📍QuickTime Player | |
| 💻Online | 📍FlexClip | |
Now, let’s begin our journey.
Before PowerPoint Presentation Recording
📌Why do you need to record a PowerPoint presentation?
Capturing a PowerPoint presentation can be useful for a variety of reasons.
💡To share with an audience that can’t attend the live presentation.
Recording your presentation allows you to share it with those who are unable to attend the live event for various reasons, such as scheduling conflicts, geographical distance or others.
💡To provide a reference for your audience.
Capturing your presentation can serve as a reference for your audience to revisit at a later time. This can be especially helpful for complex or technical presentations that require a more detailed explanation.
💡To create a tutorial or online course.
Recording your presentation can be a great way to create a tutorial or online course on a particular topic. You can use the recording as the basis for your online content or edit it with a handy video editor to create a more polished final product.
Then, how can I effectively record a PowerPoint presentation with both audio and video? Please read on to learn about specific solutions.
How to Capture a PowerPoint Presentation with Its Built-in Recorder
Screen recording is a free feature available on PowerPoint 2016/2019, while a paid one on PowerPoint 365. If you have any of these versions on your PC, you can resort to its inbuilt screen recording tool to capture your PowerPoint presentation.
✅How to Record a PowerPoint Presentation with PowerPoint 2016/2019?
1. Open your PowerPoint slideshow and then go to the slide from which you want to start recording.
2. Find Slide Show (in the top menu) > Record Slide Show.
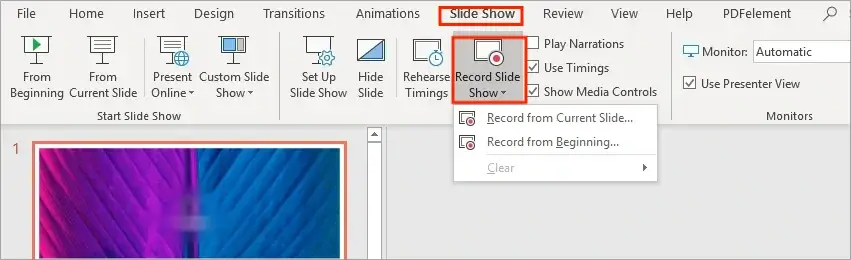
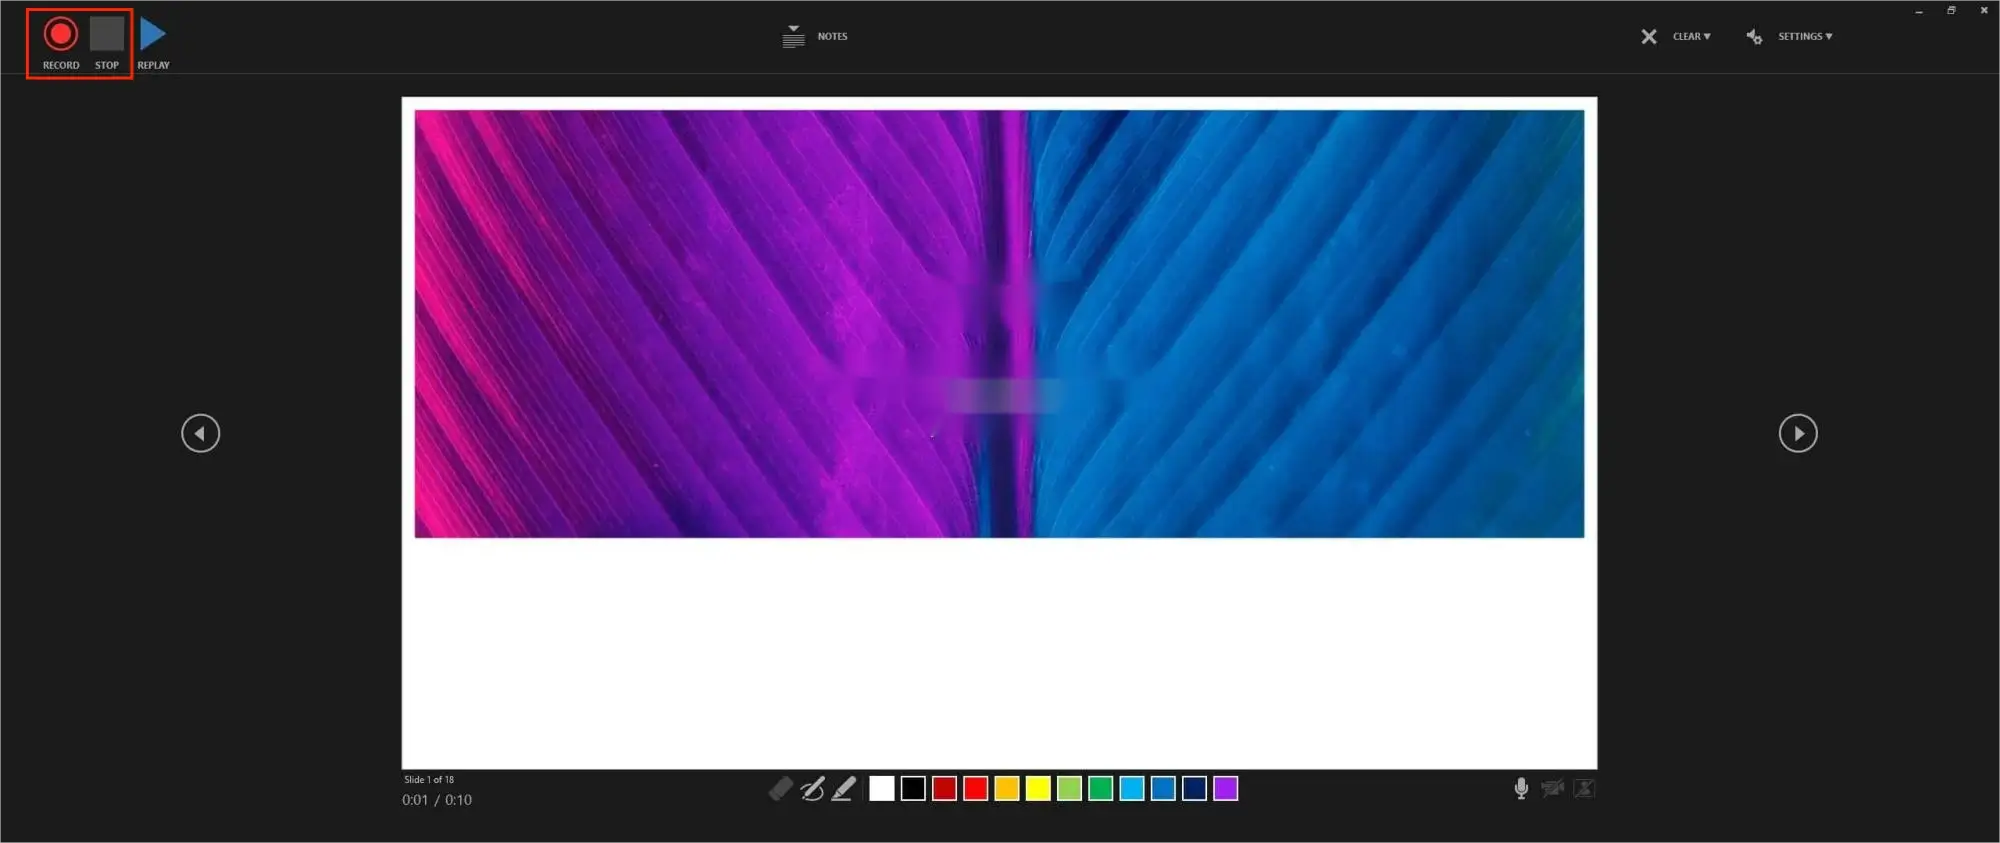
3. Click on the red Recording button and then select the slideshow to begin your recording.
(You can activate your Webcam and microphone in the Settings option and use the drawing tools below to annotate your recording.)
4. Hit the Pause or Stop icon to temporarily or temporarily end your recording.
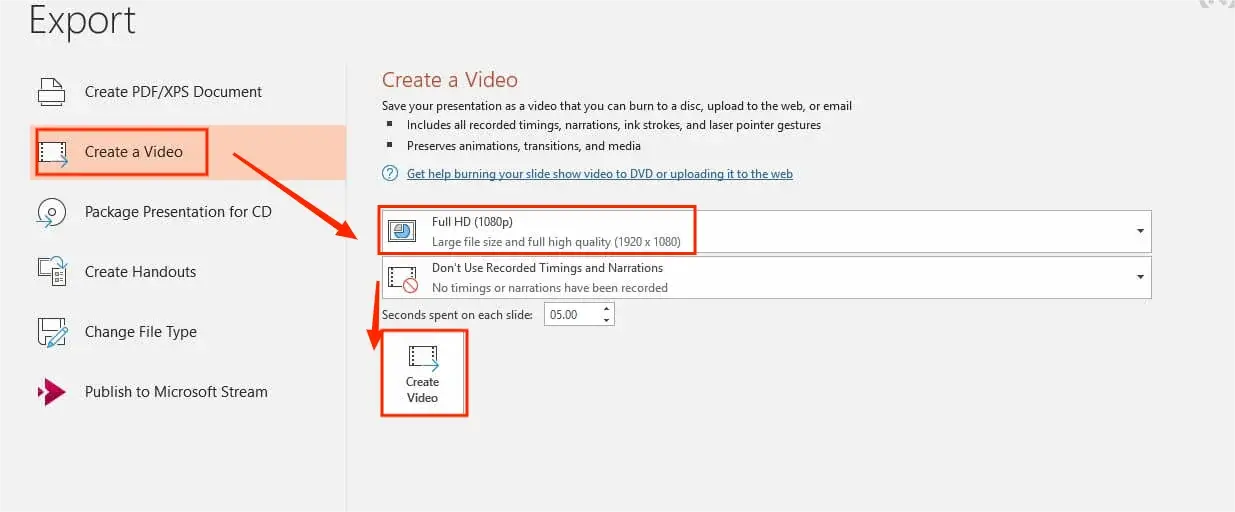
5. Then Click Export > Create a Video > Choose your video quality > Create Video to save your recording.
✅How to Create a Video of PowerPoint Presentation with PowerPoint 365?
1. Follow the first step above.
2. Find the Record button at the top right.
3. Make the options if you want to.
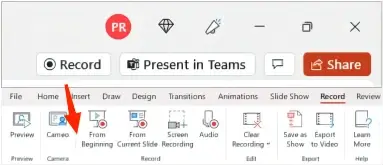
4. Click on the red Recording button in the new window.
(Activate your Webcam and Microphone by tapping the camera and phone icons beside the recording button and annotating your recording by using the drawing tools.)
5. Hit the red Recording button again to stop your recording and the Export tab to save it.

6. Click Export in a new window.

✨The Verdict
How to Record a PowerPoint Presentation with an Additional Screen Recorder
Since the recording feature is only available on certain versions of Microsoft PowerPoint (one of which is even a charged service), you can turn to a third-party tool for help. This chapter will inform you of three ways to capture a PowerPoint presentation.
✅How to Record a PowerPoint Presentation on Windows?
There are several methods of filming a PowerPoint presentation in Windows. So which one should you choose? Here, let me present a helpful tool called WorkinTool VidClipper.
WorkinTool VidClipper was initially designed as a video editor. However, intending to provide users with a powerful digital tool, WorkinTool designers have upgraded it to a multi-functional program, including a screen recorder, video converter/compressor/splitter/merger/watermark adder and remover, audio converter/extractor, AI-powered video/GIF maker, text-to-audio maker and more. Much as equipped with so many features, it still boasts a simple and clear interface.
When it comes to screen recording, you will expect a high-quality recording with(out) Webcam and audio within a few steps. Additional tools are also available to facilitate your recording. Here are more reasons for picking VidClipper.
🧐How to Record a PowerPoint Presentation Using WorkinTool VidClipper?
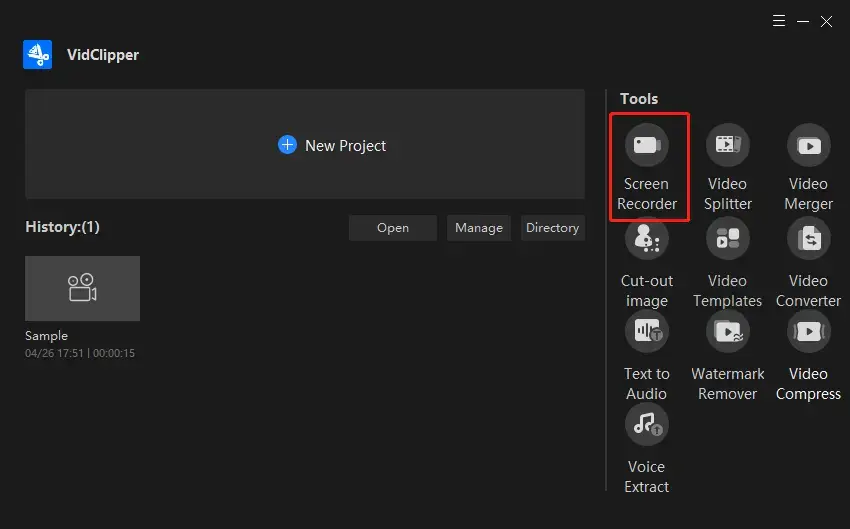
Step 1. Launch WorkinTool VidClipper and then find Screen Recorder on the right menu.
Step 2. Begin your PowerPoint Presentation recording.
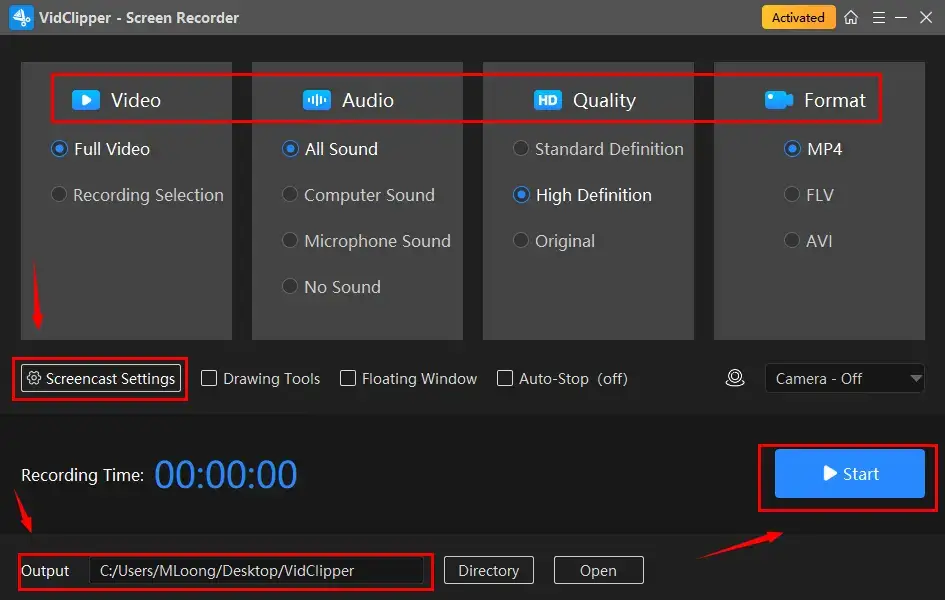
- Complete your options for recording area, audio, quality and format.
- Adjust your settings if you like.
- Activate the camera (choose the one from the drop-down box) if you plan to record yourself.
- Then, click Start (shortcut key–Alt+F1).
(Recommended recording settings: Recording Selection and All Sound)
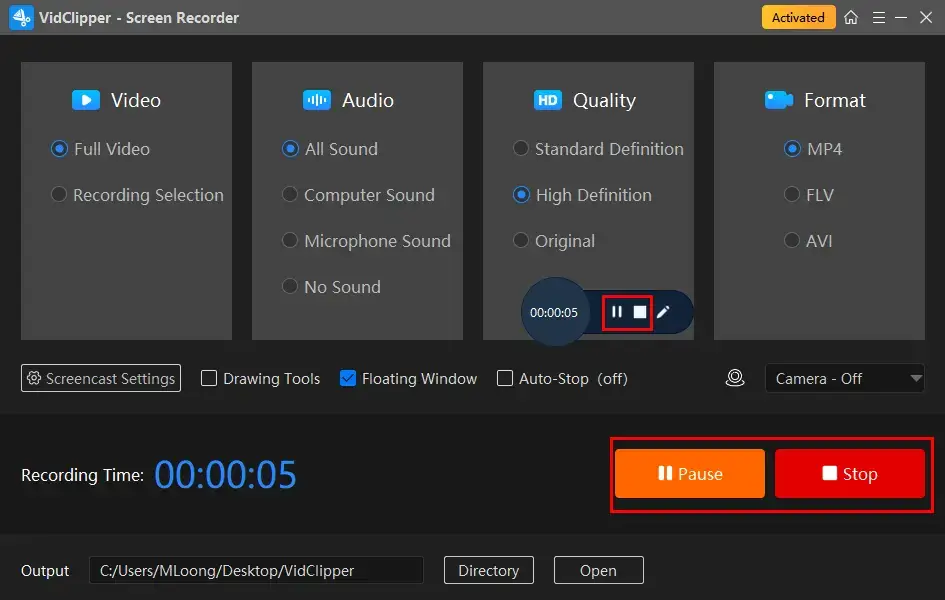
Step 3. Hit the Pause or Stop icon on the floating window or the recording page to suspend or end/save your recording.
(Shortcut keys: Pause/Resume–Alt+F1, Stop–Alt+F2.)
Step 4. Choose your next-step operation after recording.
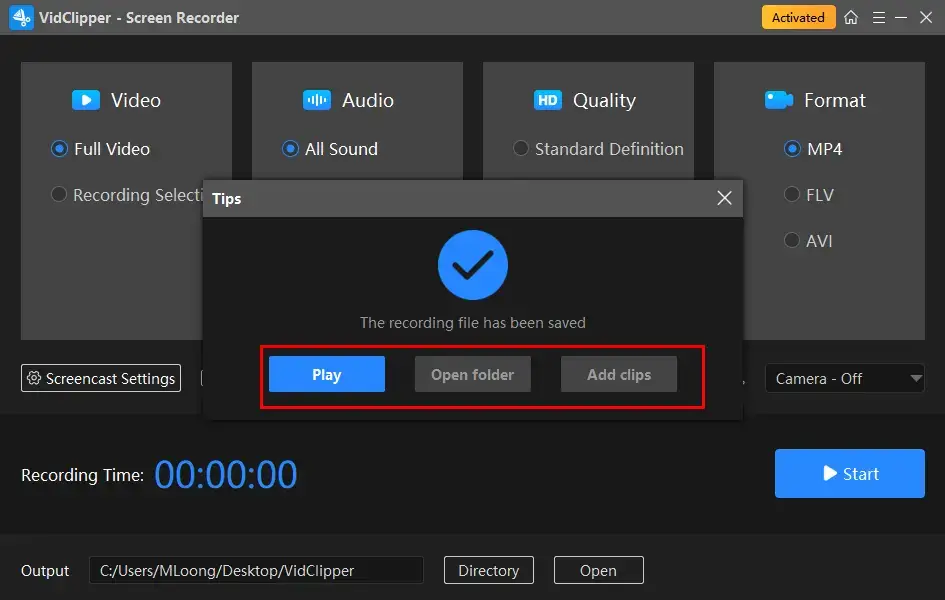
*Add clips is a useful feature that allows you to add your PowerPoint Presentation recording to the VidClipper video editor. Then you can use it to make further editing to it, including adding text, adding transitions, effects and animations, putting a filter, pixelating, speeding up or slowing down, color correcting it and more.
🙋♀️Additional Words for WorkinTool VidClipper
🎯Tell me more about its screencast settings.
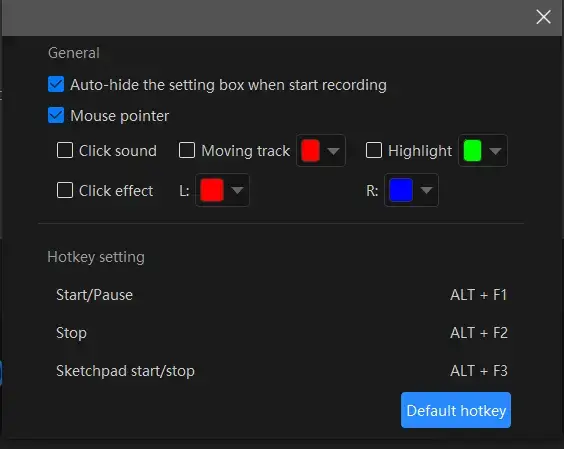
- Auto-Hide: Select this option to automatically hide the settings box once your recording begins.
- Mouse Pointer: Tick this box to customize the color of various actions, such as Moving track, Highlight, and Click effect (for both left and right clicks).
- Click Sound: Toggle this option to turn on or off the sound that accompanies each click.
- Click Effect: “Colorize” each click, both left and right.
🎯What is a Drawing Toolbar?
The Drawing Toolbar is a feature designed for you to draw lines or shapes and put text directly on your recording, saving you the hassle of having to annotate or edit your PowerPoint Presentation recordings later on. To access it, you can:
- Click on the pen-like icon located on the floating windows,
- Check the Drawing Tools option on the recording console, or
- Use the shortcut key–Alt+F3.
🎯How about Auto-Stop Feature?
The Auto-Stop feature aims to end your recording automatically. You can expect a recording on your PC even if you are away from it.
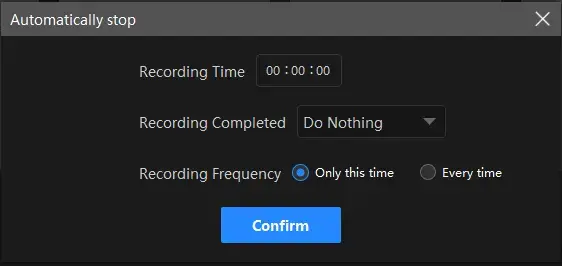
- Recording Time: Set your full recording length in advance to stop your recording automatically
- Following Recording: Personalize the post-recording operation when your recording comes to an end, including Do nothing, Exit program, Sleep and Shut down your PC.
- Recording Frequency: Choose how frequently your auto-stop settings will be activated, One Time and Every Time.
🎯What else can WorkinTool VidClipper record on video streaming websites?
| Meetings | Webex Meetings | Zoom meetings | Teams meetings |
| Gameplay | Twitch Stream | Minecraft Gameplay | Switch Gameplay |
| Social Media | TikTok | YouTube Live Stream | Facebook Live videos |
| TV Shows & Tutorials | Philo TV | Live Stream | Speedpaints |
✨The Verdict
✅How to Get a Recorded PowerPoint Presentation on Mac?
If you are a Mac user, the easiest way to get a PowerPoint Presentation recording is to use its built-in program–QuickTime Player.
QuickTime Player is equipped in almost every Apple device, being the default audio and video player. In addition to its playback capabilities, QuickTime Player offers other useful features such as video and audio conversion, as well as screen recording. Its screen recording function makes completing this task a breeze, enabling you to easily capture a screenshot or record your entire/selected computer screen with just a few clicks. However, the program’s customization options are limited, and the export format is limited to .mov.
🧐How to Produce a Recorded Version of a PowerPoint Presentation?
1). Open QickTim e Player and then go to File > New Screen Recording.
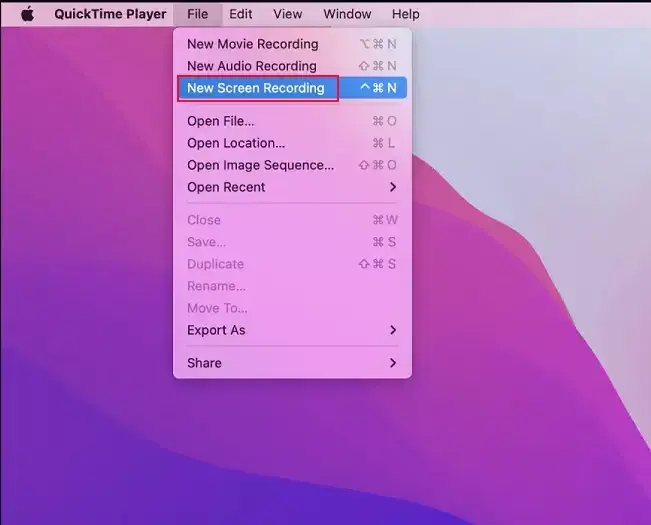
2). A small pop-up window will appear. Make your settings (microphone activation or mouse click highlight) and then click the red Record button to start your recording.

- Click anywhere on the screen to record the entire screen.
- Or drag to create a selected recording area and then hit Start Recording.
3). Press the Stop button to end your PowerPoint Presentation recording.
(Shortcut key–Command-Control-Esc)
📣Note: When your recording finishes, QuickTime Player will automatically open the recording.
✨The Verdict
✅How to Make a Screen Recording of a PowerPoint Presentation Online?
If it truly bothers you to install and use any desktop software, you can resort to a free online screen recording tool. Here, I will save your time by introducing you to the FlexClip screen recorder.
FlexClip is a highly regarded provider of online video solutions that offers its users an almost free service. It aims at the goal of addressing most common video editing challenges. The platform includes a screen recording function that targets simple capture of a computer screen and webcam content with (no) audio. What is good about FlexClip is that no watermark will be added to your output, which outweighs most free online options.
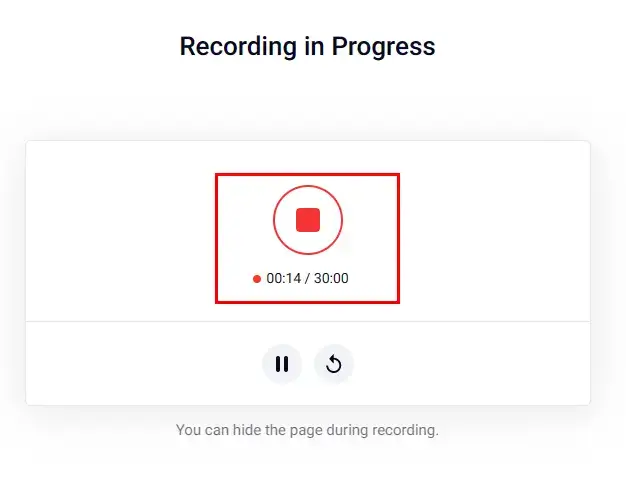
However, if you don’t feel like using its paid version, the recording process will last up to 30 minutes and the export quality will be limited to 480p.
🧐How to Record a PowerPoint Presentation with FlexClip Screen Recorder?
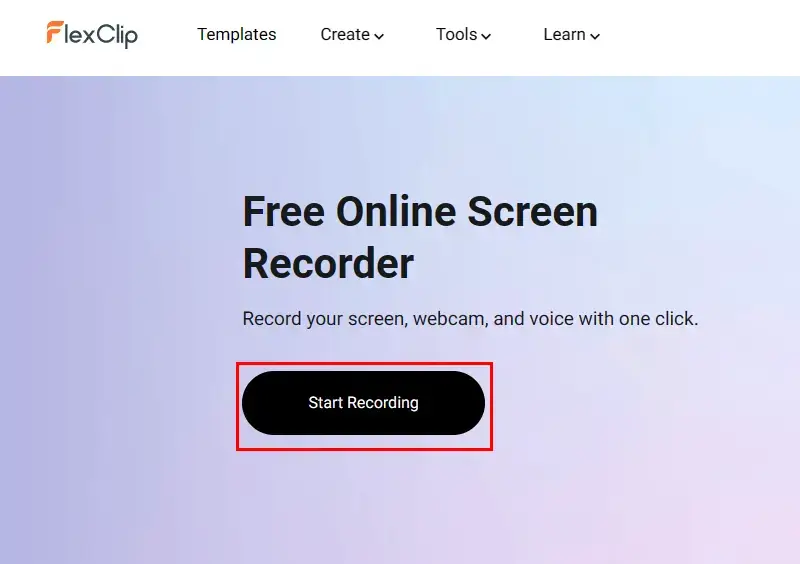
1. Open FlexClip Screen Recorder and then click Start Recording.
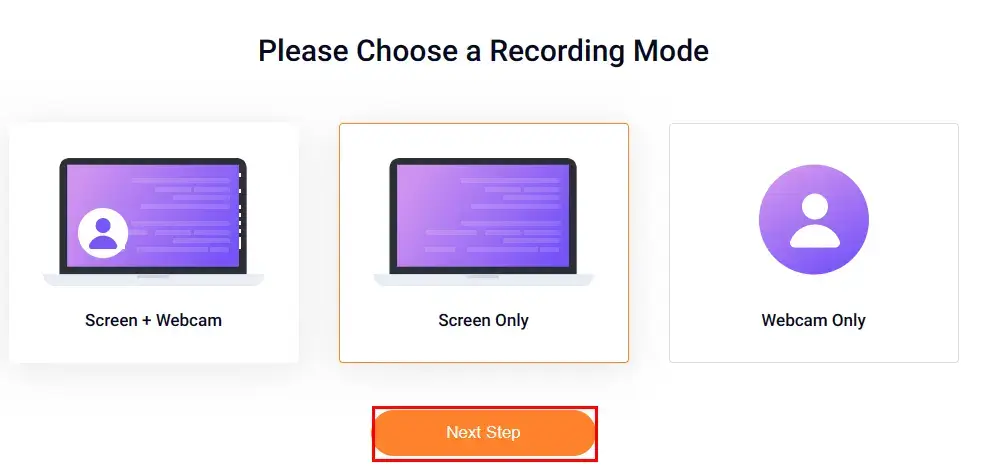
2. Pick a recording mode.
(Recommended: Screen+Webam)
3. Confirm your audio recording option.
(Recommended: Microphone+System audio)

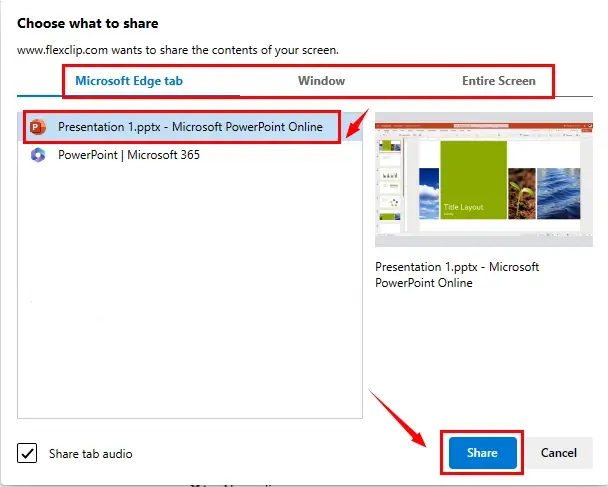
4. Determine the content to share with FlexClip and then hit Share.
(Recommended: Tab for an online presentation while Window for a desktop presentation.)
5. Hit Stop sharing on the targeted page or the red Stop button on the recording page.
(You can pause your recording by pressing the small gray Pause icon.)
6. Click Download and Edit to export your recording.
(The download will start automatically.)
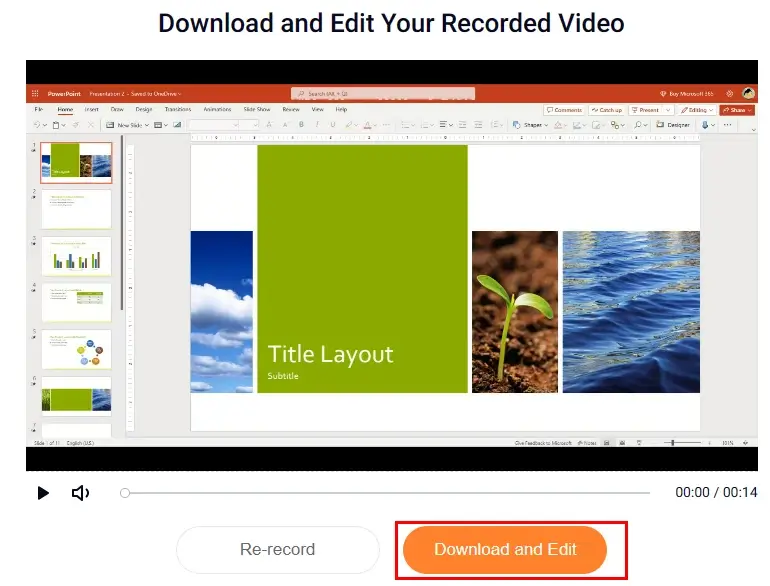
📢PS: Your recording will be moved to FlexClip online video editor for further editing. Simply close this window if you have no such requests.
✨The Verdict
More to Share
🎉How to video record yourself presenting a PowerPoint with Webcam?
You can rely on WorkinTool Vidclipper to realize this goal if you are a Windows user. Here is what you need to do:
- Open WorkinTool VidClipper and then choose Screen Recorder on the right menu.
- Mark your options: Recording Selection, All Sound, High Definition and MP4 (Recommended)
- Activate the camera by selecting yours from the drop-down box.
- Then, click Start to begin your recording.
- To stop recording, hit the Stop button on the floating window or the recording page.
If you are a Mac user, you can use QuickTime Player or FlexClip (less than 30 minutes). Just follow the above steps to fulfill this purpose.
Final Thought
This chapter marks the end of our discussion on how to record a PowerPoint presentation with(out) additional screen recording software. Please feel free to try all the aforementioned solutions based on your needs and pinpoint an ideal one.
If your computer OS is Windows, please take a closer look at WorkinTool VidClipper since it is user-friendly, easy to use and super multi-functional.
Now, are you ready to capture a PowerPoint presentation?
![]()
Related Article
 How to Record Vertical Video on PC (Windows and Mac) How to Record a Video While Playing Music on PC/Phone How to Record Messenger Video Call on PC/Phone in 2024