How to Record on Firestick on TV and PC in 2024
Amazon Firestick is definitely one of the most prevalent streaming devices worldwide since it allows you to access various online video content on people’s televisions. Sometimes, the show is so wonderful that you may want to keep it for future watch. Today, we will show you how to record on Firestick on different platforms.
📌TV: Inbuilt Screen Recorder and Third-Party Screen Recording App
📌PC: Windows–WorkinTool VidClipper and Mac–QuickTime Player
💡Recording on Firestick can be a useful way to save your favorite TV shows or movies for later viewing. By using an inbuilt or third-party screen recording app on TV or PC, you can easily capture good and even high-quality Firestick content. However, it is important to ensure that you are not violating copyright laws before recording any content.
😉If you prefer to enjoy Firestick on your Windows computer, please take a closer look at WorkinTool VidClipper since it is user-friendly, easy to use and super multi-functional to solve many of your problems. Now, please start your reading to learn about specific solutions and experience all of them by yourself.
How to Record on Firestick on TV and PC in 2024
Technological advancement has changed people’s lifestyles immensely. For example, TV enjoyment is revolutionized due to the introduction of streaming TV websites, apps or devices. Amazon Firestick is definitely one of the most prevalent streaming devices worldwide since it allows you to access various online video content on people’s televisions. Sometimes, the show is so wonderful that you may want to keep it for future watch. Today, we will show you how to record on Firestick on different platforms.
| TV | 📍Amazon Fire TV Stick Inbuilt Screen Recorder |
| 📍Third-Party Screen Recording App | |
| PC | 📍Windows–WorkinTool VidClipper [🔥Recommended] |
| 📍Mac–QuickTime Player |
Now, let’s start our journey.
Before Recording a Video on Firestick
📌What is a Firestick?
Firestick is a streaming media player developed by Amazon. Its full name is Amazon Fire TV Stick. It is a small device that connects to your TV’s HDMI port, which allows you to access a wide range of online content, such as movies, TV shows, music and games.
With Firestick, you can stream content from popular services like Netflix, Hulu, Amazon Prime Video and more. Firestick is operated through a remote control that comes with the device and is also compatible with voice commands through Amazon’s Alexa virtual assistant. Firestick has become a popular and cost-effective way to enjoy streaming content on their TVs.
📌How much does Firestick cost?
| Product | Price | Video | Audio Details |
📌Can you record a (streaming) show on Firestick?
Yes. You can capture streaming or a movie/TV show on TV with Amazon Firestick’s inbuilt screen recorder or an external screen recording app. Or if you want to enjoy shows on a PC version, you can resort to the handy screen recorder recommended in this article–WorkinTool VidClipper (Windows) and QuickTime Player (Mac).
Now, let’s move on to the central theme and learn about specific solutions.
How to Record on Firestick on TV
If you prefer to watch shows on Firestick TV, you can use its inbuilt screen recorder or a third-party screen recording app to capture them.
1️⃣Inbuilt Screen Recorder
A built-in screen recorder or DVR is available in every Amazon Firestick. It enables you to record up to four videos simultaneously and offers 8GB of free storage space to every user. Please follow the steps below to learn how to use it.
✅How to Record a Show on Firestick with Inbuilt Screen Recorder?
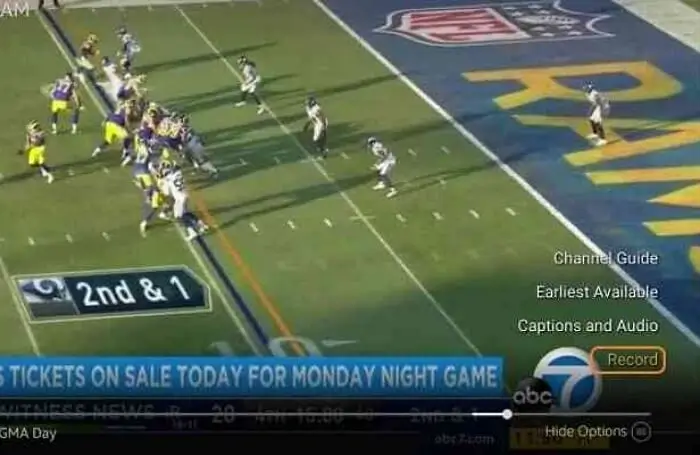
Step 1. Use the on-screen keyboard or speak a voice command to Alexa to find and play a desired show.
Step 2. Tap the Menu button on your remote controller to activate the options list when the show is playing.
Step 3. Navigate to and select Record to start recording the show.
2️⃣Third-Party Screen Recording App
Since a third-party tool can be installed on Amazon Firestick from the Amazon store, you can have an external screen recorder on it to help you realize this goal. Let’s see how this works out:
✅How to Capture a Show on Firestick with an External Screen Recording App?
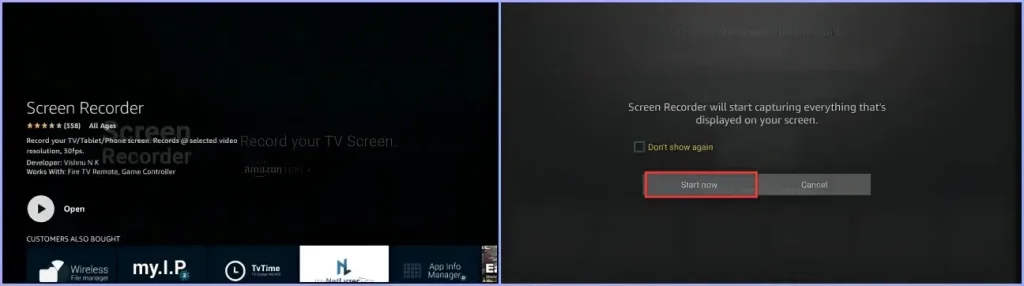
Step 1. Open the Amazon store, type “screen recorder” in the search box and then pick and install the satisfactory one.
Step 2. Then, open the screen recorder and click Start now in a new window with the prompt shown in the screenshot.
Step 3. Play the chosen streaming video or show to record them.
Step 4. Open the screen recorder again and then hit the Stop button to end the recording.
(The shows will be recorded and saved automatically when you stop recording.)
📢PS: Users usually can’t record audio or DRM-protected content from apps like Prime Video or Netflix.
✨For Your Reference
How to Record on Firestick on PC
As you can see, limitations apply to the approaches mentioned above. Are there any ways to record on Firestick without time limit? Yes. If you want to enjoy Firestick recordings without limitations, you’d better resort to recording alternatives on your PC. Here, we will inform you of two practical screen recording apps–WorkinTool VidClipper (Windows) and QuickTime Player (Mac).
1️⃣WorkinTool VidClipper (Windows)
VidClipper was initially designed as a video editor by a promising SaaS brand–WorkinTool. Committed to providing a great tool for everyone, its designers have endowed it with a super multi-functional program able to resolve many of your issues. Therefore, having it on your computer will offer the following (but not limited to) features:
Hence, it saves you the trouble of finding and installing them individually, which is efficiency-improving and space-saving.
Using WorkinTool VidClipper as a screen recorder, both beginners and professionals will find it useful and valuable. Thanks to its simple and clear interface with various helpful settings, beginners will get a high-quality custom recording with minimal effort. They can capture any content on their computers (system and/or Webcam) with(out) system audio and/or microphone sound. For professionals, multiple tools, like the drawing toolbar and auto-stop feature, are available to help with their recordings. Additionally, they can add the recording to VidClipper’s editing console for further editing.
🎉Key Strengths of WorkinTool VidClipper as a Screen Recorder
|
✅How to Record on Firestick Using WorkinTool VidClipper?
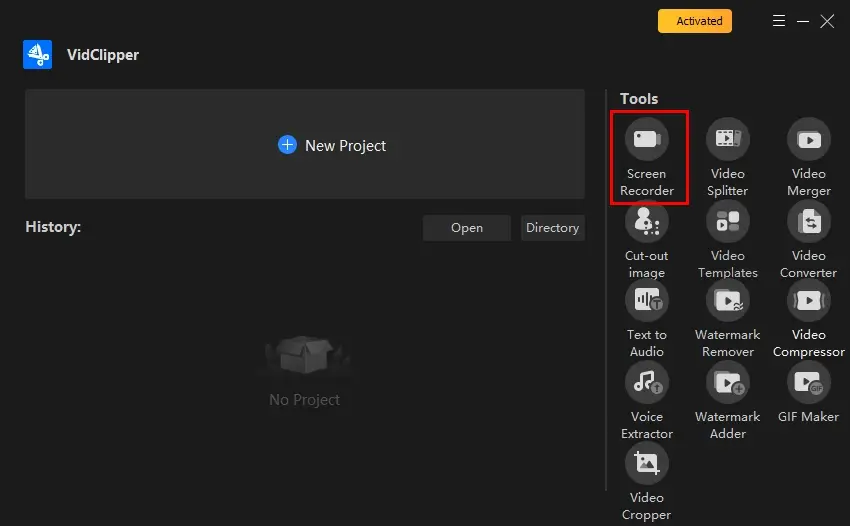
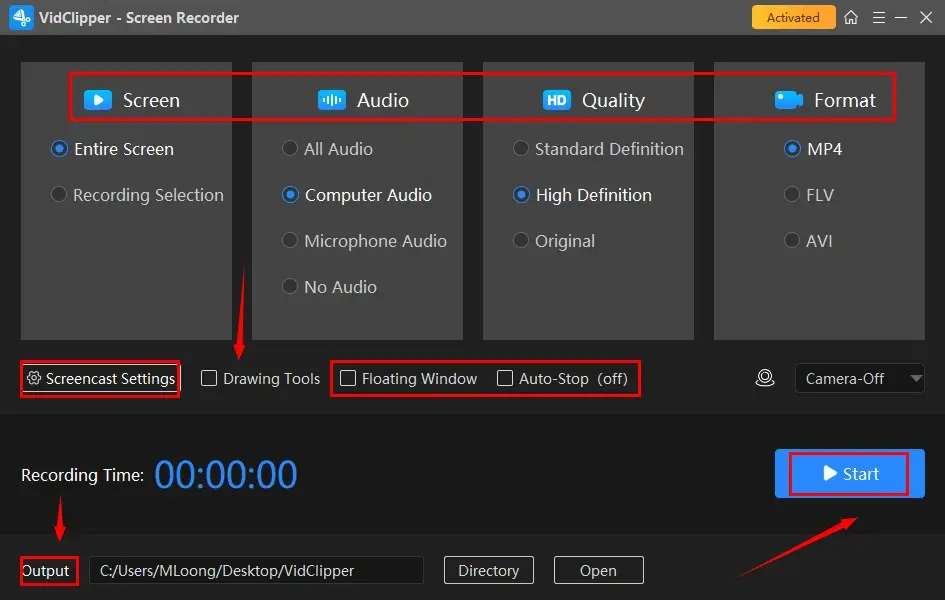
Step 1. Launch the app and then find Screen Recorder on the right menu.
Step 2. Confirm your options, including Recording Area, Audio, Quality and Formats, adjust the screencast settings (if you want to) and then click Start (shortcut key–Alt+F1).
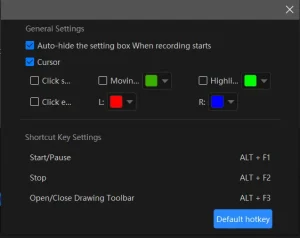
*Inside Screencast Settings
Step 3. [Not Necessary] Activate the drawing toolbar or auto-stop feature to help you with your recording.
Drawing Toolbar |
Auto-Stop |
 |
 |
|
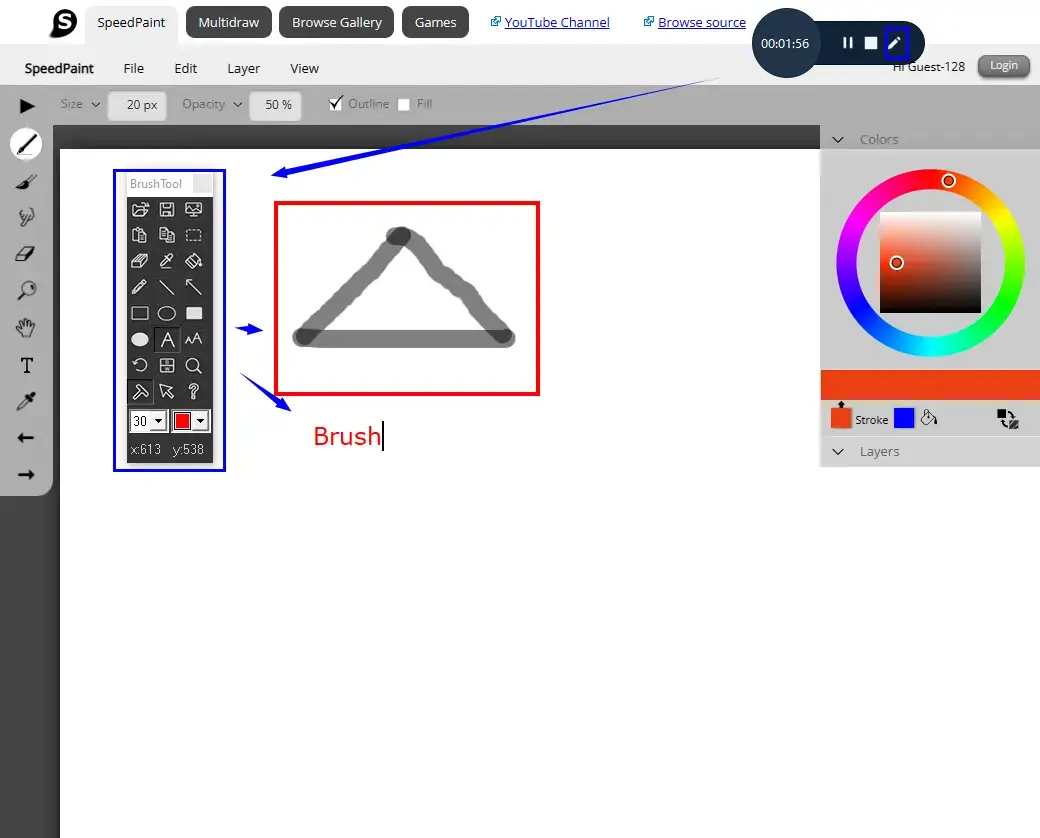
A drawing toolbar is available to draw lines or shapes and annotate your recording directly. Therefore, you save the trouble of having to complete the relevant operations after your recording. You can activate it by
|
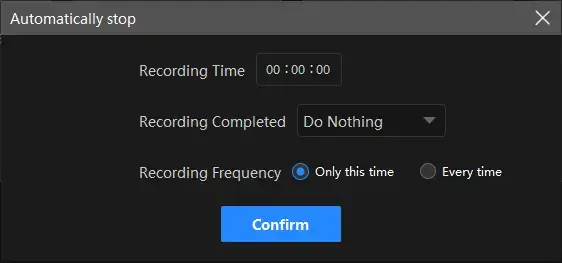
The auto-stop feature is designed to end your recording automatically after the full recording length is set. Therefore, you don’t have to worry about your recording, even when being away from your computer.
|
Step 4. Hit Pause or Stop on the floating window or the recording page to suspend or end and stop your recording.
(Shortcut key: Pause/Resume–Alt+F1 and Stop–Alt+F2)
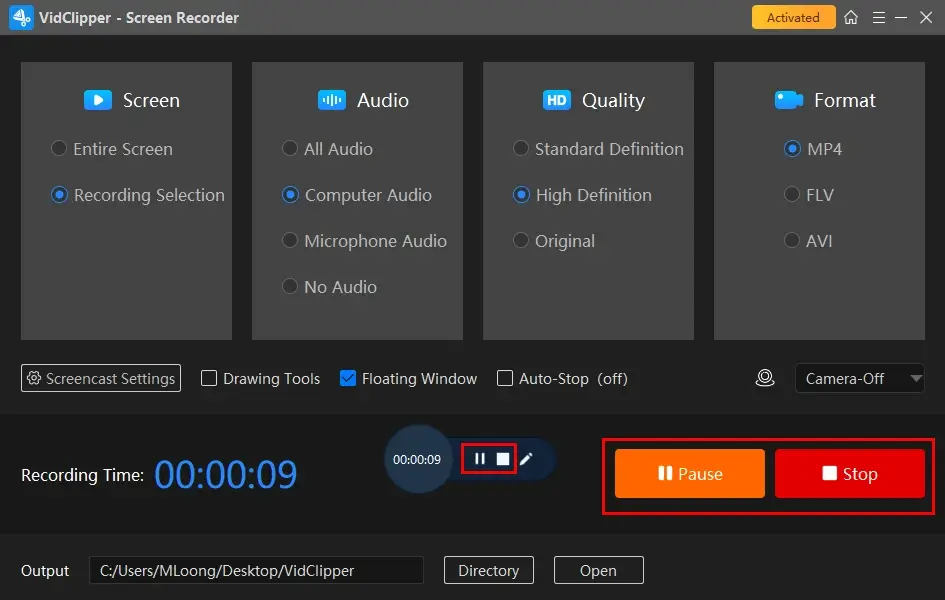
Step 5. Determine your next move.
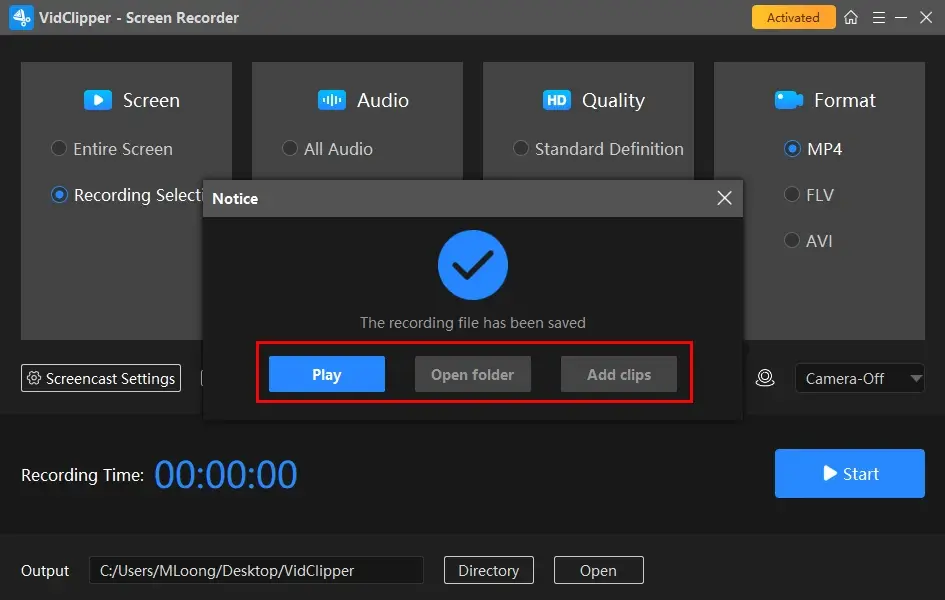
*Add clips is a beneficial feature since clicking it helps to move your recording to VidClipper’s editing console and allows you to edit it as you like, including:
| Trim a Video | Crop a Video | Add video transitions, effects and animations | Put a filter on a video |
| Overlay a video | Make a split screen video | Add text to a video | Speed up a video |
📣PS: What other TV shows or videos can WorkinTool VidClipper capture?
✨For Your Reference
2️⃣QuickTime Player (Mac)
If you are a Mac user, the easiest way to get a recording from Firestick is to use its built-in app–QuickTime Player.
QuickTime Player is the default multimedia player on every Apple device. More than an audio/video playback function, it also serves as a screen recorder to capture your Mac screen’s entire or selected area. You can get the content on it with or without audio. Furthermore, the operations prove to be easy and convenient.
✅How to Get a Firestick Recording with QuickTime Player?
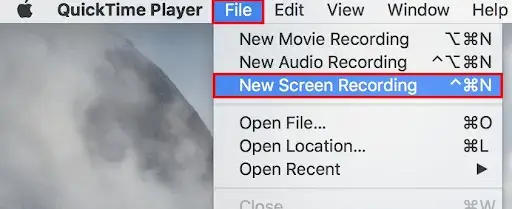
Step 1. Open QuickTime Player and then navigate to File > New Screen Recording (shortcut key-Command + Control + N).
Step 2. Confirm the recording area, adjust the audio settings and click the Record button in the pop-up recording menu to begin your recording.
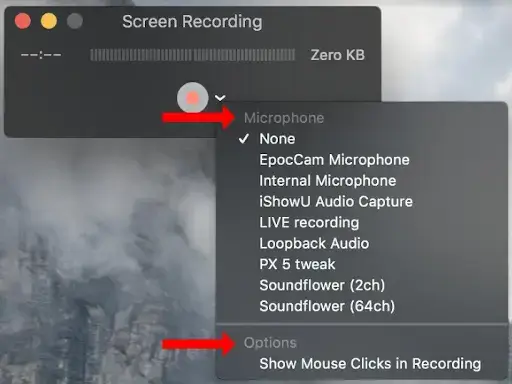
- To record the entire screen, simply click anywhere on your computer screen to start recording.
- To record a specific area, drag your cursor to decide your recording area and then hit Record.
Step 3. To stop your recording, press the Stop button (shortcut key–Command + Control + Esc)
(The screen recording will be saved to your computer and you can then edit it in iMovie if you want to.)

✨For Your Reference
More to Share About How to Record on Firestick
🎯How do I watch recordings on Firestick?
If your recording is on your TV, please go to the DVR or My Stuff tab on your Fire TV to watch and manage your recordings. Please follow the instructions below:
- Navigate to DVR or My Stuff on the Fire TV homepage.
- Go to the row–My Recordings to locate your recordings.
If you record your shows on a PC Firestick app, you can find it in the place which you set as the save path in your screen recording software.
🎯How do I record from Firestick to USB?
To realize this goal, you should prepare your USB or pen drive first and find the built-in or third-party screen recorder. Then, you can find references from the following guidance:
- Plug your USB drive into the Firestick USB port.
(Note: Please make sure that the USB drive is compatible with the Firestick.) - Use the inbuilt or third-party screen recording app to record the Firestick screen.
- Start playing the show you want to record on your Firestick and begin recording.
- Stop the recording once it is finished, find it on Fire TV and then save it to your USB drive.
🎯Why is my Firestick not recording?
These are the reasons why a recording issue happens:
- Loss of connectivity between Fire TV Recast and your home network.
- Loss of power due to a power outage or an unplugged power cable.
- Issues with antenna connection.
- Transmitter interference affecting channel reception or quality in your area.
Final Thought
This chapter marks the end of our discussion on how to record on Firestick on TV and PC. In summary, recording on Firestick can be a useful way to save your favorite TV shows or movies for later viewing. By using an inbuilt or third-party screen recording app on TV or PC, you can easily capture good and even high-quality Firestick content. However, it is important to ensure that you are not violating copyright laws before recording any content.
If you prefer to enjoy Firestick on your Windows computer, please take a closer look at WorkinTool VidClipper since it is user-friendly, easy to use and super multi-functional to solve many of your problems.
![]()
Now, are you ready to get a recording from Firestick?
Related Article
 How to Screen Record Threads Videos 2024 | PC and Phone How to Record a Google Voice Call on Phone and PC in 2024 How to Record on FuboTV Without Limit on PC in 2024