[Updated]How to Screen Record on Surface Pro 2024
The Surface Pro is the tablet of choice for many office workers and college students. So for frequent online courses and internet meetings, knowing how to screen record on Surface Pro is the best bet. But how? In this article, we offer three different approaches. Among them all, WorkinTool VidClipper is the optimal solution. It is easy to use and has no time constraints or watermark issues. You can use it with all the functions for free. So don’t wait up and go experience the magic right now!
How to Screen Record on Surface Pro in 2024
Without a doubt, the Surface Pro is a very popular and easy-to-use two-in-one detachable tablet from Microsoft. Now that Microsoft has launched its eighth series, Surface Pro’s user base has amassed a significant amount. The potential demand for it is also growing, as is how to screen record on Surface Pro.
Equipped with the Windows system, most computer-compatible software applications can run directly and fluidly on the Surface Pro. Office workers and college students who don’t need much of a computer are ditching their bulky laptops for the Surface Pro. For them, frequent online meetings and courses are very common. if recording directly on the Surface Pro is optional, that will save a lot of time and effort on other errands. Here in this post, we will give you three detailed methods of how to screen record on Surface Pro.
How to Select a Microsoft Surface Pro
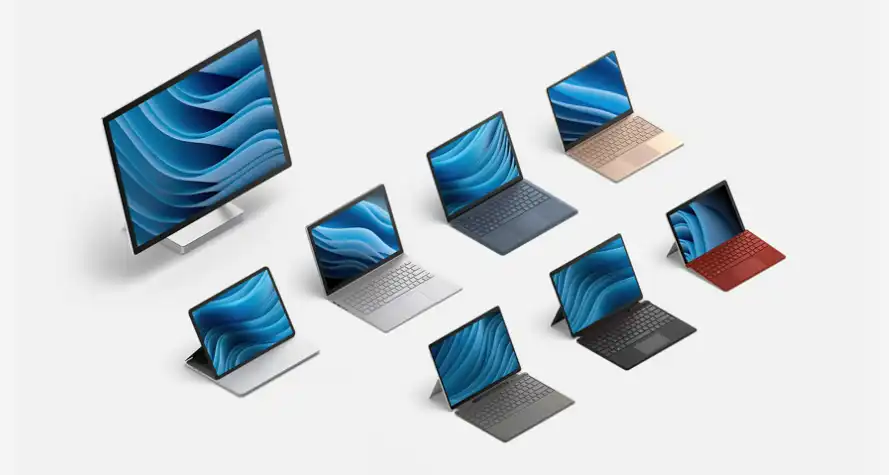
There are a number of factors you need to consider in order to pick the Surface Pro that works best for you. For the student body, the first problem is the price, the screen size, and if the practicality meets the needs of students in class. For commuters, the demand for the Surface Pro is likely to be more focused on performance, memory share, and portability. After all, no one wants the tablet to crash in the middle of a meeting right? In response, Microsoft has created a web page to help users pick out new surface computers.
One issue is that the page is being repurposed for something other than the Surface Pro. If you just want to compare the Surface Pro, here’s a chart to help you compare the specs of the last three generations of the Surface Pro. For more details, you can use this as a reference.
The Surface Pro 8 VS Pro 7 VS Pro 6 Specs
| Surface Pro 8 | Surface Pro 7 | SP 6 | |
| Starting price | from $1,099 | from $749 | $799 |
| Display | 13-inch touchscreen (2880 × 1920 pixels) | 12.3-inch touchscreen (2736 × 1824 pixels) | 12.3-Inch touchscreen (2736 × 1824 Pixels) |
| CPU | 11th Gen Intel Core i5-i7 | 10th Gen Intel Core i3-i7 | 8th Gen Intel Core i5 – i7 |
| Graphics | Intel Iris e Graphics | Intel UHD and Iris Plus | With Intel UHD Graphics 620 (i5) Intel UHD Graphics 620 (i7) |
| RAM | 8-32 GB | 4-16 GB | 8-16 GB |
| OS | Windows 11 Home | Windows 10 Pro or Windows 11 Pro | With Windows 10 Pro |
| Storage | 128-256 GB (LTE), 128 GB – 1 TB (Wi-Fi only) | 128 GB-1 TB SSD | 128 GB-1 TB SSD |
| Size | 11.3 × 8.2 × 0.37 inches (ca. 9 mm) | 11.5 × 7.9 × 0.33 inches (ca. 8 mm) | 11.5 × 7.9 × 0.33 inches (ca. 8 mm) |
| Weight | 1.96 pounds (0.89 kg) | 1.6 pounds (0.73 kg) | 1.7 pounds (0.77 kg)(i5), 1.73 pounds (0.78 kg)(i7) |
How to Screen Record on Surface Pro: WorkinTool VidClipper
Because Microsoft Surface Pro is based on the Windows system, virtually any screen recording software that works on a PC can run perfectly on it. The WorkinTool VidClipper that we recommend here is an excellent screen recorder. After our test on Surface Pro, it doesn’t show any incompatibility issues. It can work perfectly on the Surface Pro 8, Surface Pro 7, and 6. WorkinTool VidClipper offers users a varied range of functions to record screen content. Users can use it to record Teams meetings, live-streaming videos, and capture online gameplay.
There are built-in multiple custom options to make recording screen settings more user-friendly. Users can flexibly adjust the size of the recording screen and take screenshots at any time. Moreover, all these features of WorkinTool VidClipper are totally free of charge. You don’t need to worry about the export limits or watermark problems because they won’t exist with WorkinTool VidClipper.
🎓 Easy Solution 🎓

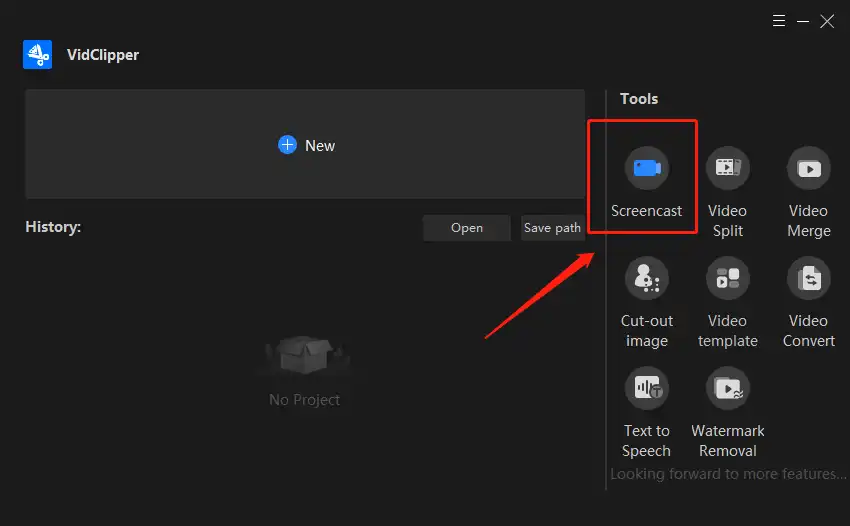
1. First, go download and launch it on your Surface Pro. Click Screencast and go to the screen recording page.
2. Then, here, you need to configure the basic recording settings. VidClipper offers users four different functional recording settings. You can customize these options according to your needs.
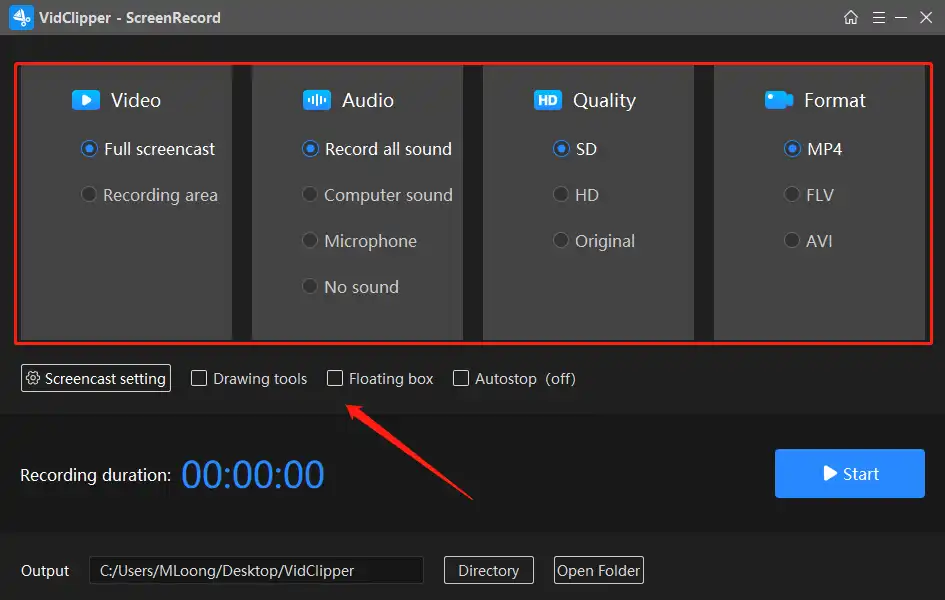
🎉 Basic Recording Options 🎉
| Video |
Full Screencast: You will get a full-screen recording once after clicking this button. This will include the entire screen of your computer. Recording Area: Users are offered to select a certain part of the screen to be the screen capture region. It starts right after clicking the Start button. |
| Audio |
Record all sound: All the audio that your computer has input and output will be recorded together. There could be sound from your computer system, online meeting or live-streaming sounds, your microphone, and others. Computer Sound: The audio on the computer will be exclusively recorded in your video. Microphone: Nothing else except for your microphone sound will be included in your recorded video. No Sound: Your recorded video will be muted for the whole video. It is more suitable for post-dubbing video production. |
| Quality |
SD: Normal video definition 720P for most video platforms. AKA 1280×720. HD: 1080P, it is a higher definition for SD. 1080P AKA 1920×1080. (about 2 million pixels) Original: It stays the same definition as your recording video. |
| Format |
MP4: Set MP4 as your exported video format, suitable for most video platforms. FLV: FLV format is the exportation video format, it is for small video clips. AVI: Convert screen recording video with audio to AVI format, fit for large and lossless videos. |
3. Lastly, you can set it to start recording. Hit the Start button to record or use the hotkey ALT+F1, or ALT+F2 to start/suspend/stop the recording.
The saved folder is also available for you to modify.
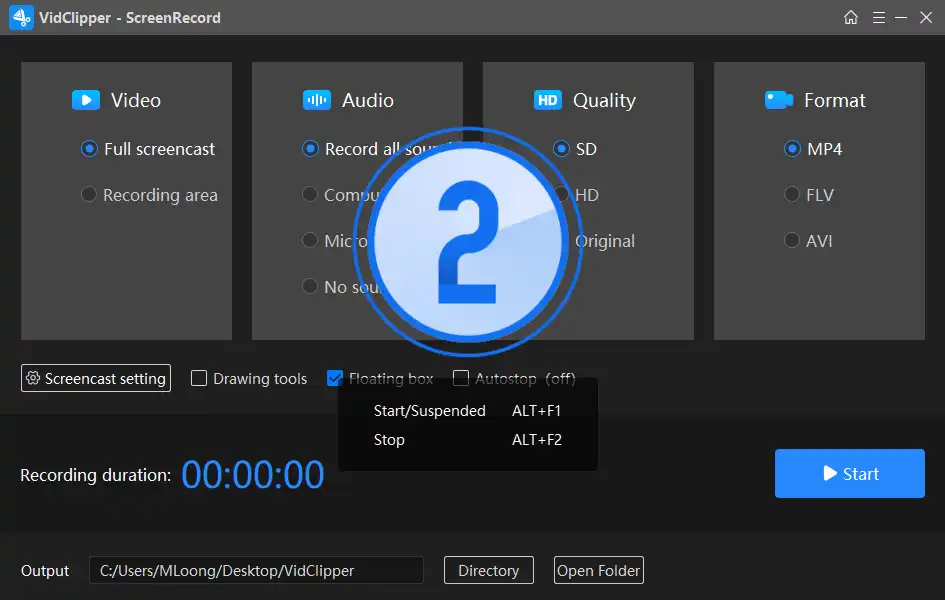
📣 Additional Options 📣
Of course, beyond the four basic video recording functions mentioned above, the WorkinTool VidClipper also has three ancillary features to help users better deal with video recording issues. The best thing about using the recording screen on the Surface Pro is that the tablet supports the touch-screen function. So it’s very necessary that it supports drawing on it. WorkinTool also thought it would be nice to add a feature that allows users to annotate content while recording on the screen.
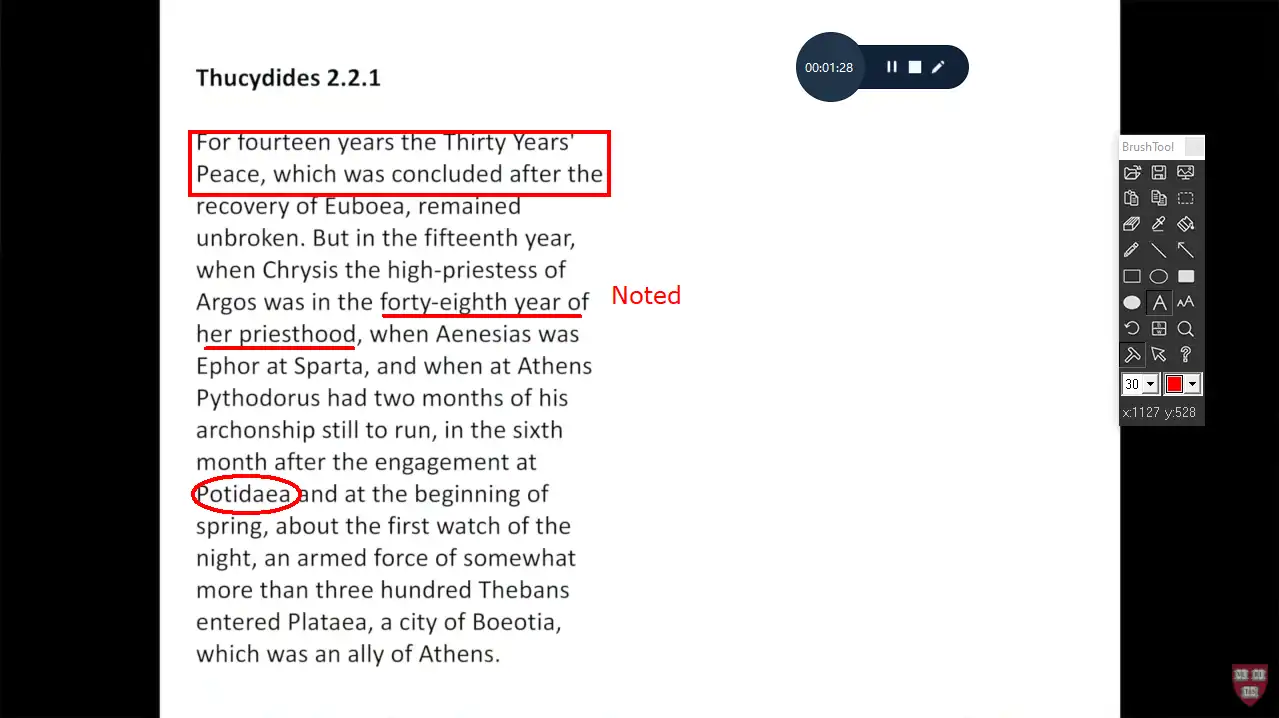
(Taking notes on recording lecture video)
| Mouse Tracking | Automatically Stop | Drawing Tool |
|
|
|
Why You Should Use WorkinTool
WorkinTool VidClipper is more than just a video recording function, it is more like a comprehensive video processing software. Once you’ve finished recording a video you want, you can always import it into WorkinTool’s video editing function. The built-in editing feature also includes almost all of the features currently available on the market. You can use it for free here, from simple video cropping to adding titles, special effects, and more. Fully meet the user for the video processing of the whole process. You no longer have to download a series of video processing software, one at a time to work on them. WorkinTool VidClipper does all the jobs in one go. What’s not worth trying right now.
🎉 More VidClipper Features 🎉
| Standard Video Editing Features | Additional Video Management Tools |
| Edit a Zoom Recording | Freeze Frame a Video
Add Video Transitions, Effects, and Animations
|
Method of Screen Recording on Surface Pro: Game VCR
Is there a way to screen record on Surface Pro other than downloading third-party software? Of course, since the Surface Pro already uses Windows 10 as its primary operating system, naturally, all built-in applications are also functional here. The Xbox Game Bar, AKA Game VCR, is also included.
This feature was originally designed to record game performance. However, it is also available to capture other activities on your Surface Pro, such as online courses, TV series, and game stream tutorials. Now, let’s check it out.
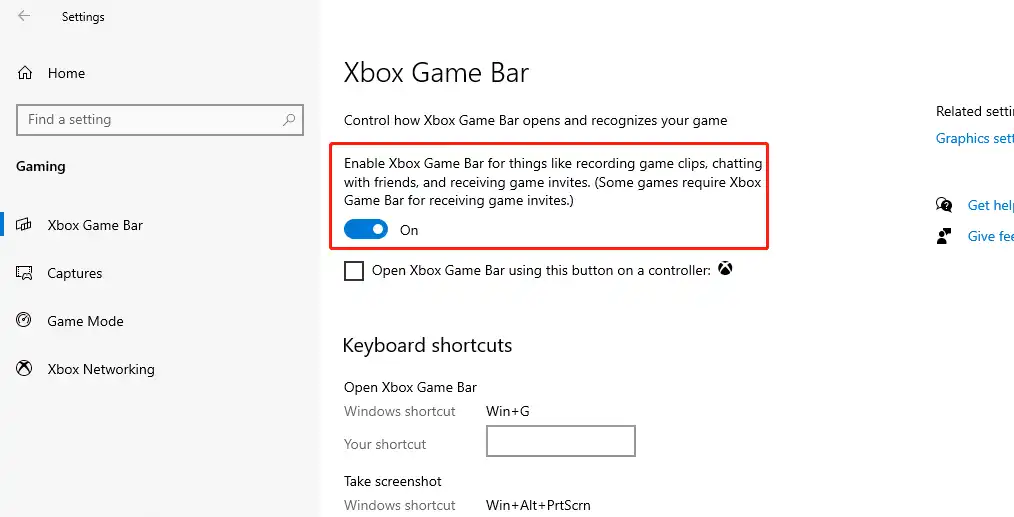
First, enable the game bar settings:
- Go to Settings > Gaming > Game Bar > Record game clips, screenshots, and broadcast using Game Bar.
You can now start recording your screen or game using the Game DVR feature:

- Press Windows + G > Click Yes, this is a game.
- Click the red recording button to start. (Or use the hotkey Windows + Alt + R)
- Same as starting, if you want to stop recording, click the red button or Windows + Alt + R.
- Open the Game Bar > Show All Captures to check your recordings.
How to Screen Record on Surface Pro: Microsoft Stream
Microsoft Stream provides a video sharing service that allows users to manage video content, including viewer permissions. You can also organize your videos into one channel or group. This application works great with other Microsoft official apps like Microsoft 365, Teams, SharePoint, and so on.
Such an excellent Microsoft video software also naturally has a recording function. If you have a Microsoft account and want to record a 15-minute video with the Surface Pro. You might want to give it a try.
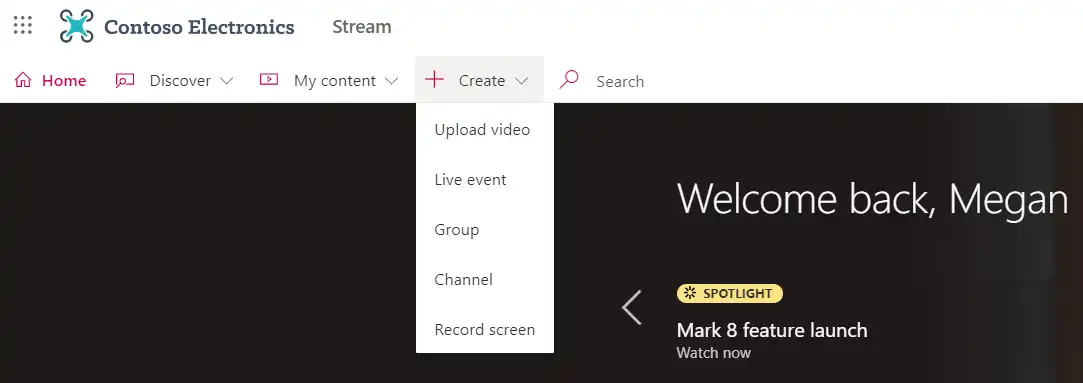
- Open a browser and go to Microsoft Stream.
- Create > Record Screen > Allow Microsoft Stream to use your camera and microphone.
- Configure recording settings. Hit the big recording icon to start the recording.
- Press the pause button to stop recording. Check your recorded video by clicking the play button.
🚨 Notice:
Screen Recorder works on the following browsers:
- Windows 10 Microsoft Edge, version 79 and above.
- Google Chrome, version 74 and above.
- Safari on macOS is not supported.
- Microsoft Stream (Classic) Mobile on iOS and Android is not supported on mobile browsers
Other limitations
- System audio recording is not available on macOS.
- camera recording is not available when recording a window or browser tab.
- Users can only screen record to a maximum length of 15 minutes. Longer content is advised to break into shorter segments.
FAQ About Surface Pro Recording
Does Surface Pro have a built-in Microphone?
Sure, all devices of Surface Pro are equipped with a microphone. Users can find the microphone using the Control Panel – Sound. By checking the NVIDIA card you will see the default microphone.
Why isn’t the camera working?
There could be several possibilities:
- The application doesn’t allow the camera.
- Antivirus software forbids you from using the camera.
- Didn’t upgrade the camera drivers
- You blocked the Camera access in your privacy settings.
How to Record Google Meet on Surface Pro?
If you want to record Google Meet on Surface Pro, we recommend you use WorkinTool VidClipper. It is amazing in many ways. Easy-to-use and user-friendly. You can use it for free without worrying about the time limit or watermark issue.
Conclusion
To sum up, in this article we have concluded the three best ways to screen record on Surface Pro. The three methods, whether built-in software, online service, or third-party software, are all free to use the screen capture feature. Although some of the software may be limited, at least after we have tried to use them many times, we are certain that these methods are feasible before recommending them to everyone. You’re welcome to pick one and try it out.
If you have any suggestions or problems, feel free to contact us.

Related Article
 How to Screen Record on Acer Laptop in 2024 | 4 Ways How to Screen Record on Snapchat in 2024 [Web and App] How to Screen Record Threads Videos 2024 | PC and Phone