How to Record Lectures (Online Classes) on Laptop | 5 Ways
In this article, we will show you how to record lectures or online classes effortlessly on your laptop. From built-in software options to third-party applications, we will offer step-by-step instructions on hassle-free lecture recording, ensuring that you never miss valuable information during your online learning journey.
📌Windows: 📍Built-in Software–Xbox Game Bar and 📍Third-Party Tool–WorkinTool Capture Screen Recorder
📌Mac: 📍Built-in Software–Screenshot Bar and 📍Third-Party Tool–OBS Studio
📌Online: 123 Apps (Online Screen Recorder)
🙋🏻♀️By following the methods mentioned in this article, you can easily capture and revisit important information from your online classes. Whether you opt for the built-in software available on your laptop or the third-party apps, the key is to find a method that suits your needs and preferences.
🙋🏻♂️However, if you are a Windows user looking for a handy desktop screen recorder, WorkinTool Capture Screen Recorder is your ideal option. It is user-friendly, easy to use, reliable and multi-functional to do more than just lecture recording. Now, please start your reading and experience all of them by yourself.
How to Record Lectures (Online Classes) Easily on Laptop | 5 Ways in 2024
As online learning continues gaining popularity, particularly after the pandemic, it has become increasingly important to record lectures or online classes. Whether you want to review course materials, capture important discussions or revisit complex/confusing topics at your own pace, the mastery of lecture recording skills on your computer provides a valuable resource. In this article, we will show you how to record lectures or online classes effortlessly on your laptop. From built-in software options to third-party applications, we will offer step-by-step instructions on hassle-free lecture recording, ensuring that you never miss valuable information during your online learning journey.
| 💻Windows | 📍Built-in Software–Xbox Game Bar |
| 📍Third-Party Tool–WorkinTool Capture Screen Recorder [🔥Recommended] | |
| 💻Mac | 📍Built-in Software–Screenshot Bar |
| 📍Third-Party Tool–OBS Studio | |
| 💻Online | 📍123 Apps (Online Screen Recorder) |
Now, let’s start our journey and discover the mystery of lecture recording together.
Before Lecture Recording
📌Can you record lectures?
Yes. A range of handy screen recorders are available to easily help you with this request. However, since there are so many options, which should you choose? Please read on to learn about specific answers.
How to Record Lectures or Online Classes on Windows
In this chapter, we will introduce you to two approaches to lecture recording on Windows with a built-in program and a third-party tool, respectively.
✅Built-in Program: Xbox Game Bar
Xbox Game Bar is an inbuilt screen recorder in computers or laptops powered by the latest Windows versions like Win 10 and 11. It is completely free and pre-installed on every Windows device. Besides, it is known for its simple and clear interface, together with a one-click recording process. Users can rely on it to capture any content on their laptop screen with or without audio, especially gameplay.
💡How to Capture lectures with Xbox Game Bar?
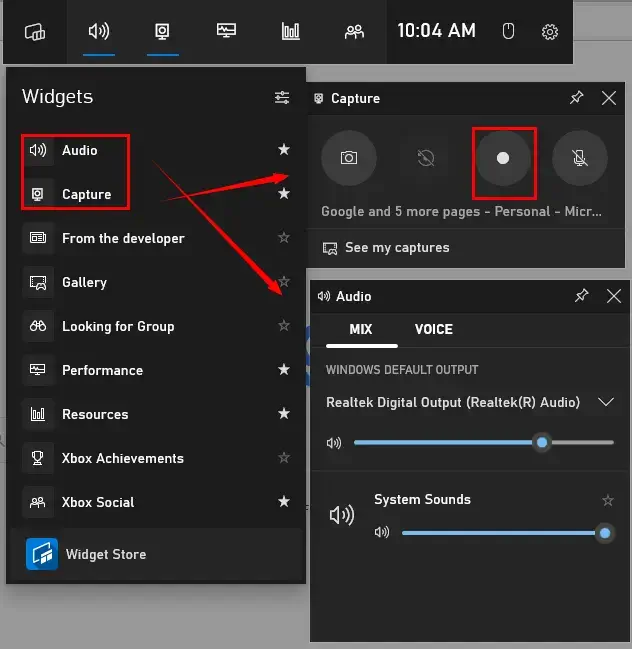
- Perform the shortcut operation-Win+G to activate this program.
- Click the Audio and Capture icons to open the audio and recording menu and then adjust the settings if needed.
- Press the Record (small white dot) button to begin your recording.
- Hit the blue Stop icon on the floating window to end and save it.
📃Note: To view your recording, please click See my capture to take you to your recorded videos.
✨Our Advice
✅Third-Party Tool: WorkinTool Capture Screen Recorder
Capture Screen Recorder, instead of being an independent app, belongs to the WorkinTool VidClipper Video Editor, a lightweight but super multi-functional tool with the following (but not limited to) features:
Therefore, this all-in-one app will give you all the essential tools to deal with plenty of your daily and professional problems, which is time-saving and efficiency-boosting.
Capture Screen Recorder is suitable for everyone. Its simple and intuitive interface will greatly facilitate beginners, enabling them to complete their recording tasks within one page. Hence, they can skip the cumbersome process of continuously hitting “Next.” Its additional screencast settings and toolbars can assist professionals in exporting more custom recordings. Furthermore, its 80+ other editing features can allow them to edit or re-create their recordings without hassle.
Used as a lecture screen recorder, Capture Screen Recorder lets users capture their online classes with customized recording areas and audio sources. Their recordings can be saved in three video formats, which can be convertible to more in the VidClipper video editor. Besides, its drawing toolbar allows them to annotate or add marks to their recordings, while the auto-stop function helps them schedule the time to end their recordings in advance.
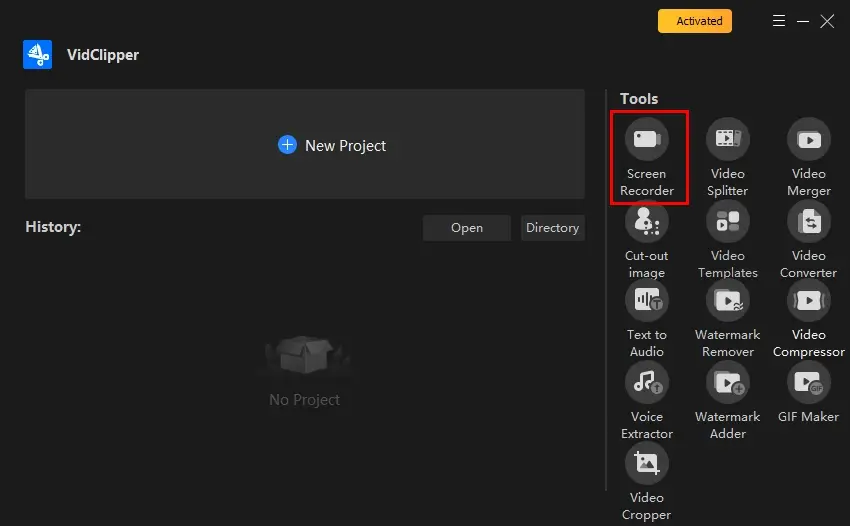
💡How to Record Lectures Using WorkinTool Capture Screen Recorder?
Step 1. Launch VidClipper and then choose Screen Recorder on the right menu.
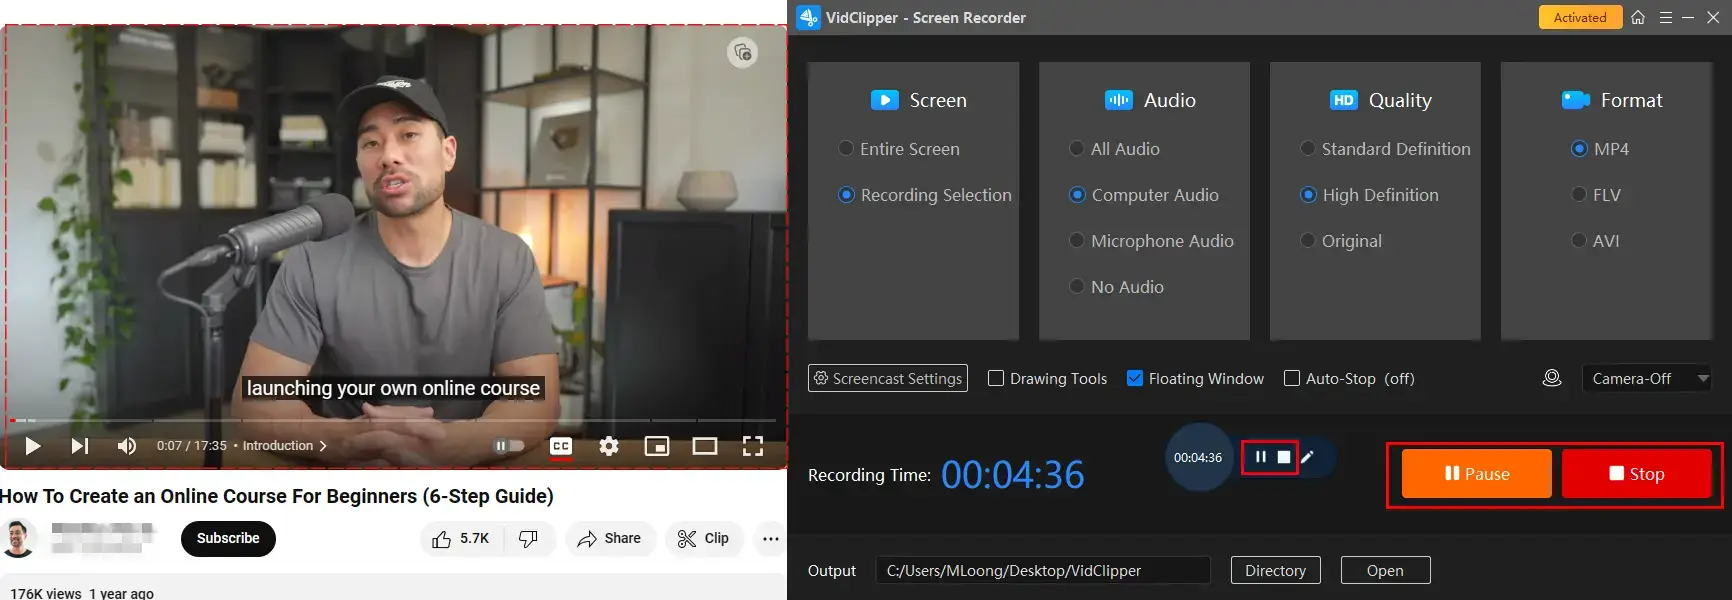
Step 2. Confirm your recording options.
(Advice: Recording Selection + System Audio + High Definition + MP4)
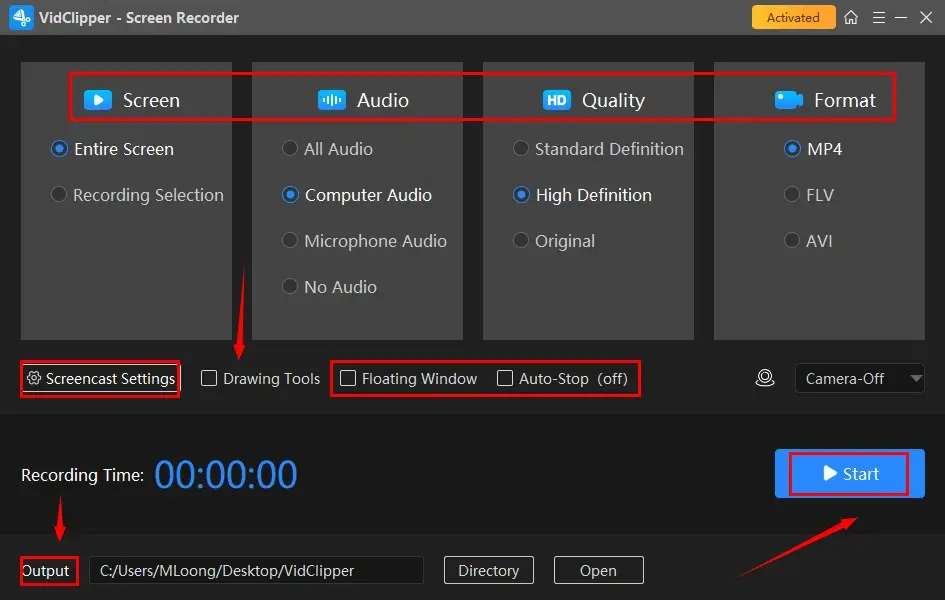
Step 3. Use screencast settings to highlight mouse pointer and more if necessary and then click Start (Alt+F1).
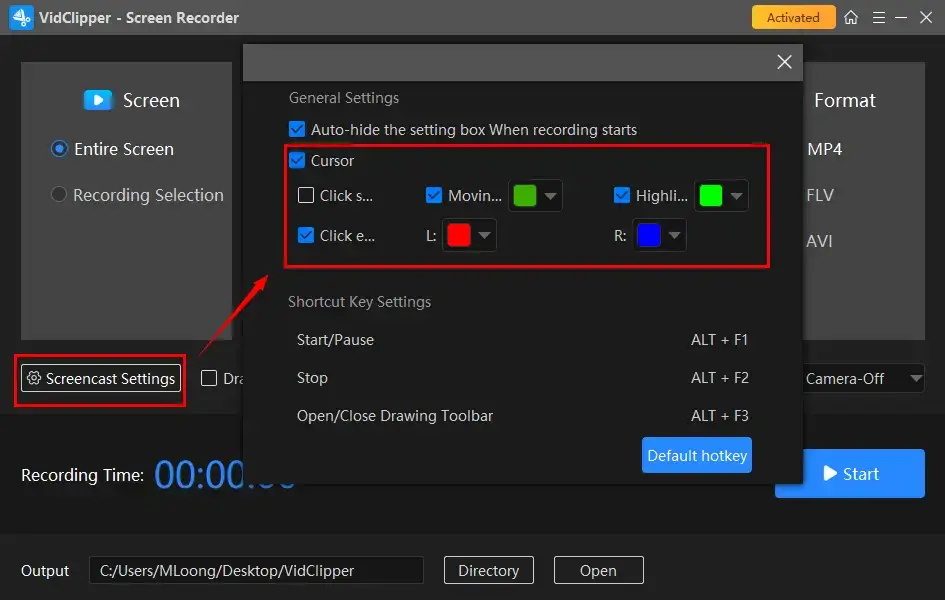
Step 4. Activate the drawing toolbar and/or auto-stop feature if needed.
Step 5. Press the Pause (Alt+F1) or Stop (Alt+F2) button on the floating window or recording page to suspend or end and save your recording.
Step 6. Determine your next move.
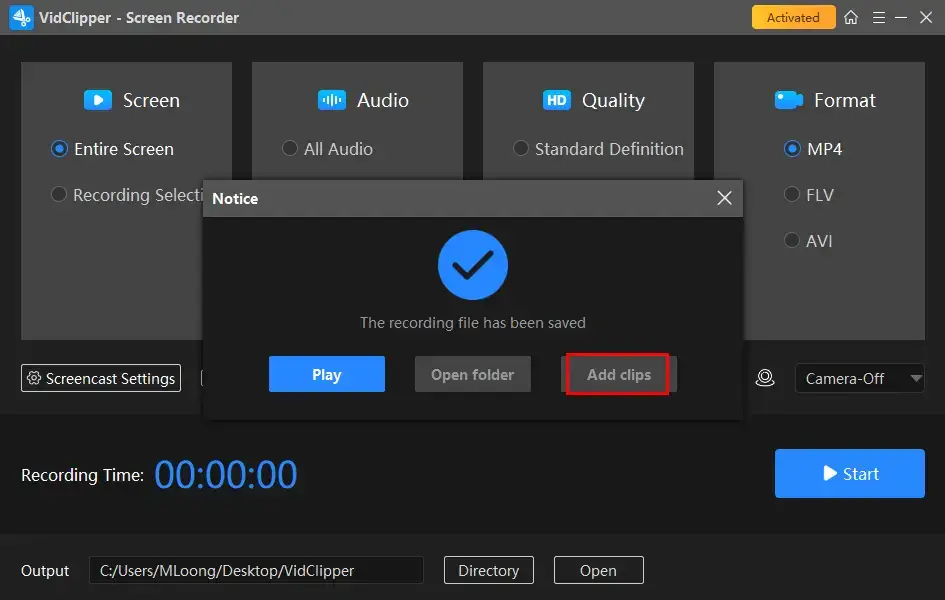
📣PS: Add clips is a useful feature that helps users move their recordings to the VidClipper video editor. They can be further edited there, including:
✨Our Advice
🧐You May Also Like
How to Record Lectures or Online Classes on Mac
In this chapter, we will inform you of two methods of lecture recording on Mac. Of course, both a built-in app and a third-party tool will be covered.
✅Built-in App: Screenshot Bar
Screenshot Bar is a built-in tool pre-installed on every Apple device powered by the latest macOS versions. It is designed to take screenshots of and capture the content on your Mac laptop. Therefore, users can depend on it to record their lectures or online classes with(out) audio. Compared with its QuickTime Player, it boasts a simpler activation and recording process.
💡How to Get a Lecture Recording Through Mac Screenshot Bar?
1). Use the hotkey-Shift + Command + 5 to enable the screenshot bar.
2). Choose the recording area: the full screen or the recording portion.
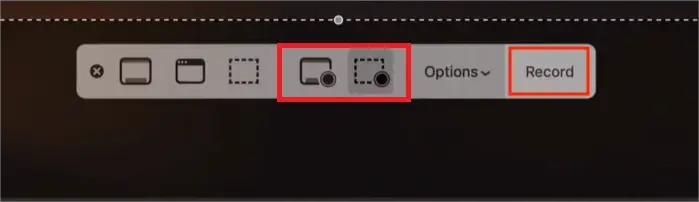
3). Click Options to change your settings.
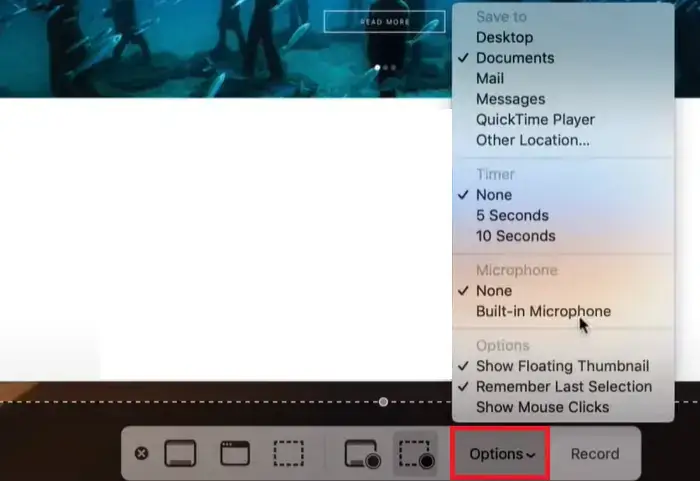
4). Hit Record to begin your lecture recording.
5). Press the Stop button at the top to end your recording.
(Shortcut key–Shift + Command + Esc)

✨Our Advice
✅Third-Party Tool: OBS Studio
OBS Studio, short for Open Broadcaster Software Studio, is a free and open-source program for screen recording and live streaming. It captures global users’ minds with its multiple professional recording modes and cross-platform availability, including Windows, Mac and Linux.
OBS offers users various recording modes, from browser and operating windows to the entire screen and gameplay capture. So, their different needs can be properly satisfied, including lecture recording. Additionally, several useful settings are available to help them personalize their recordings, such as video formats, aspect ratios, recording length and more.
💡How to Get a Recorded Lecture via OBS?
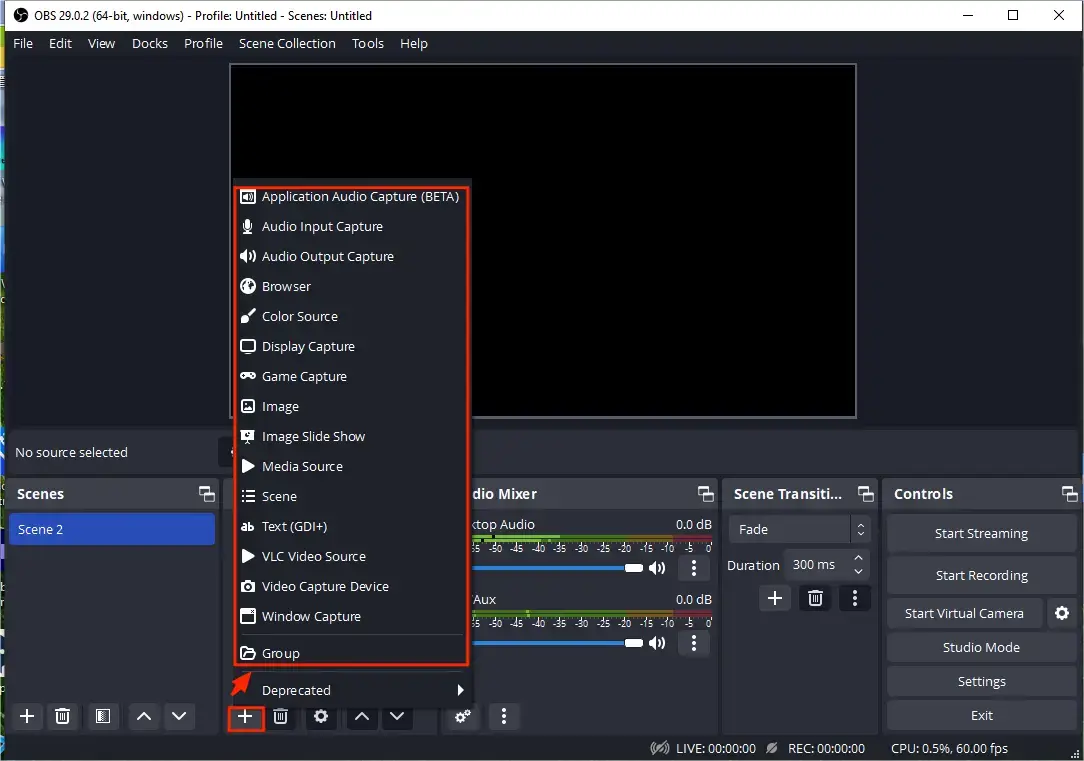
1. Open OBS and then go to Sources > + > the desired recording mode.
(Advice: Browser for a web-based online class, Window for an app-based class, Display Capture for the entire screen)
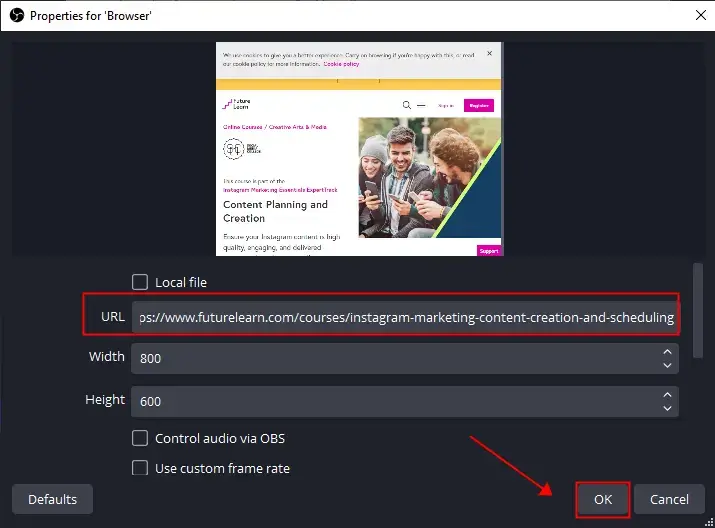
2. Take Browser as an example: Name your recording and then hit OK.
3. Copy the URL of your online class, paste it to the column beside URL in OBS and then press OK.
(The content will automatically appear on the monitor.)
4. Adjust your audio sources in Audio Mixer and then click Start Recording.
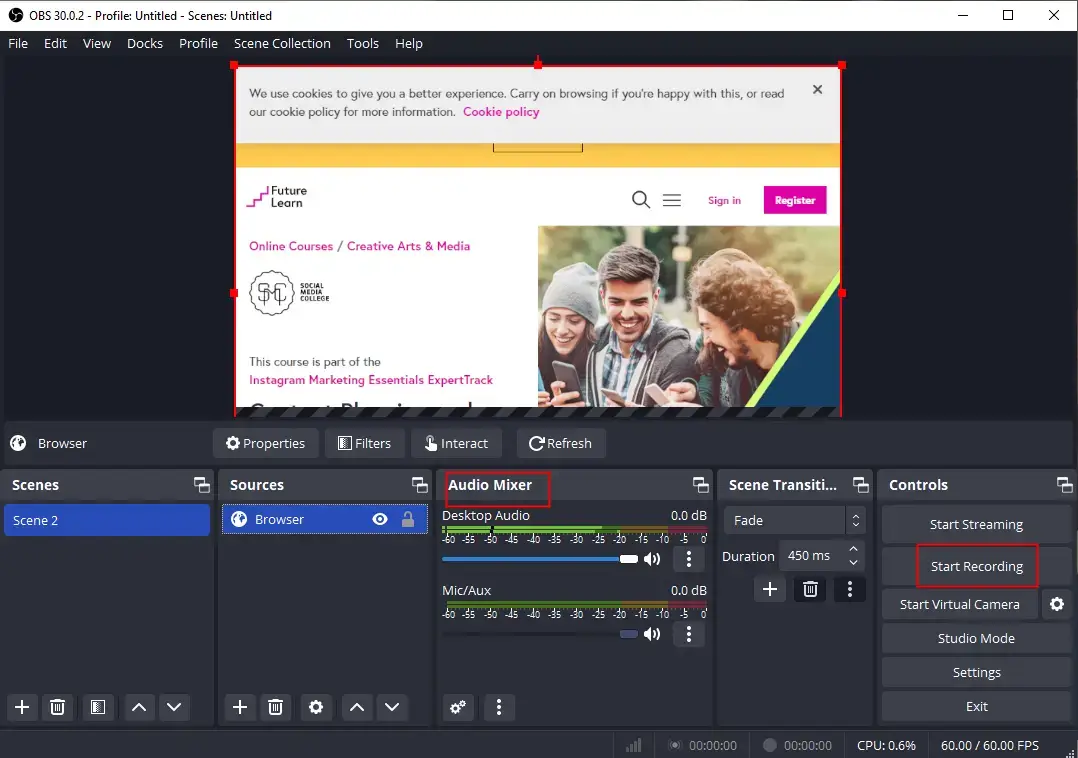
5. Hit Stop Recording to end and save your lecture recording.
(Press the small Pause button to temporarily stop it.)
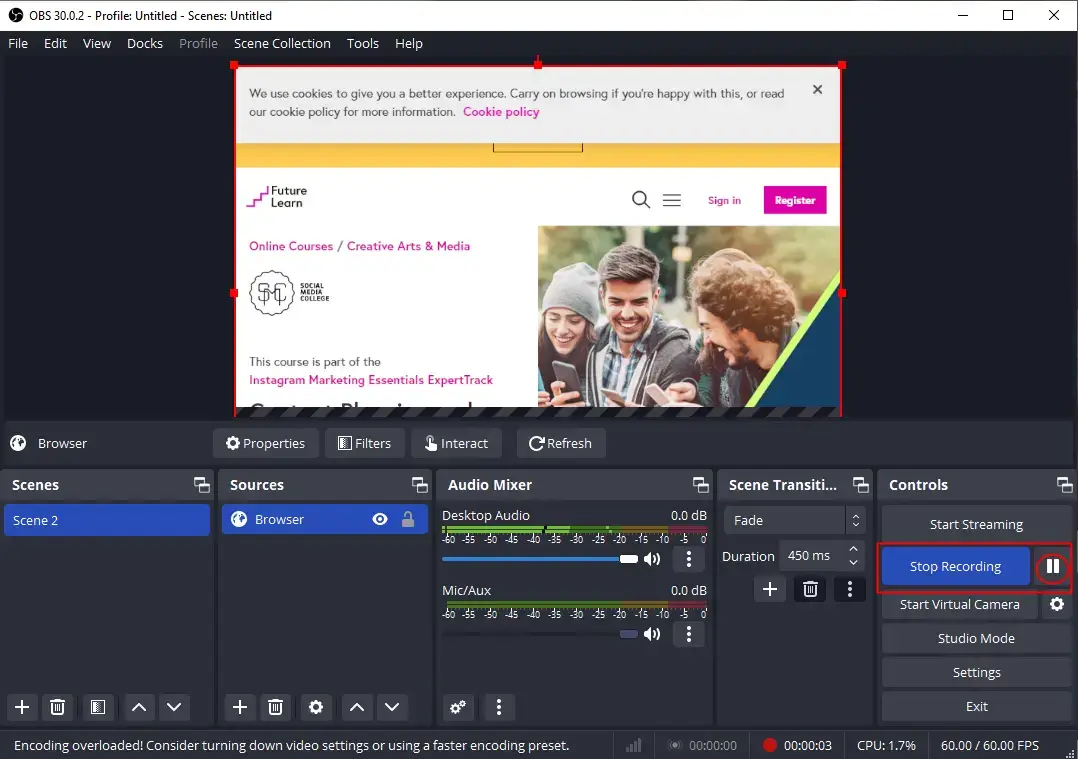
6. To view your recordings, please go to File > Show Recordings.
✨Our Advice
How to Record Lectures or Online Classes Online
If it truly bothers you to install and use any desktop software, this chapter is worth your attention. We will show you a useful online tool–Online Screen Recorder presented by 123 Apps.
✅123 Apps
123 Apps is a website with a collection of free online tools. It targets simple document/video/audio conversion, editing and manipulation without the need for software download and installation. To capture lectures or online classes, you need its online screen recorder, which offers a simple and clear interface and effortless recording process. Besides, it gives users three recording modes, including browser tab, window and the entire screen, to meet their different needs. In comparison with other online screen recorders, the one provided by 123 Apps will not add a watermark to your recording and boasts a longer recording length–90 minutes.
💡How to Record Lectures Online with 123 Apps Online Screen Recorder?
Step 1. Open 123 Apps and then locate Screen Recorder.
Step 2. Click Start Recording and then sign in to your account to use this tool.

Step 3. Determine your recording options and then hit Next.
(Advice: Screen)
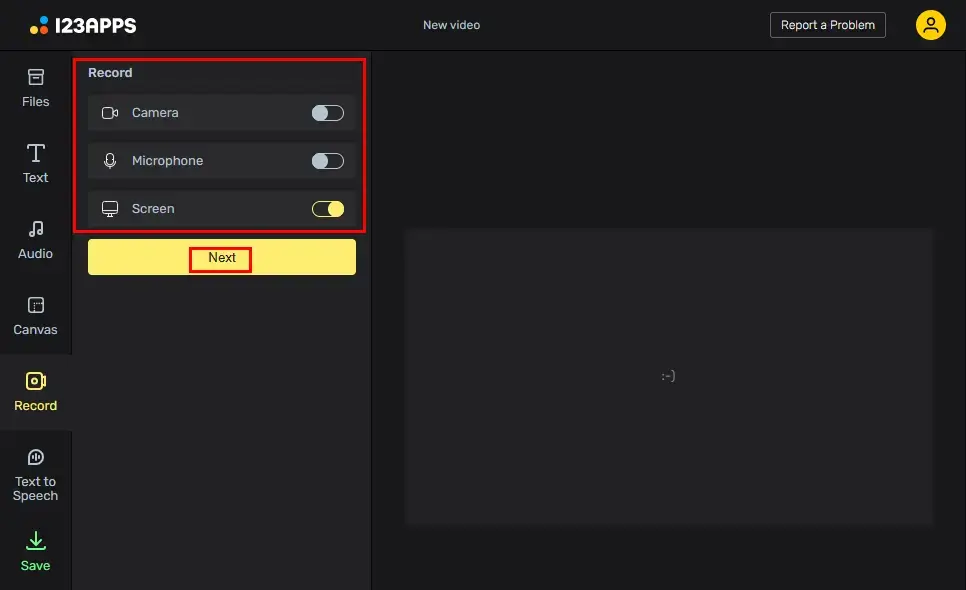
Step 4. Press the yellow Record button to begin your recording.
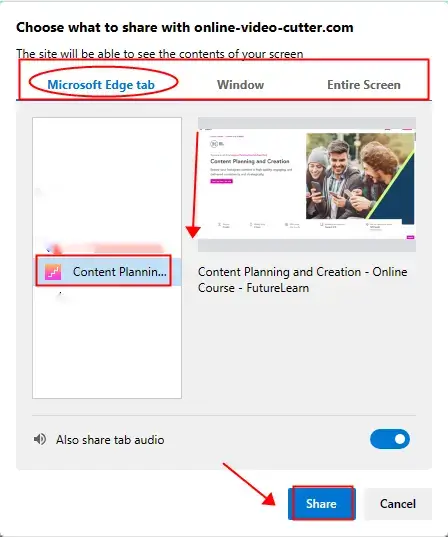
Step 5. Select the content to share with the screen recorder and then click Share.
(Advice: Tab for an online class while window for an app-based class)
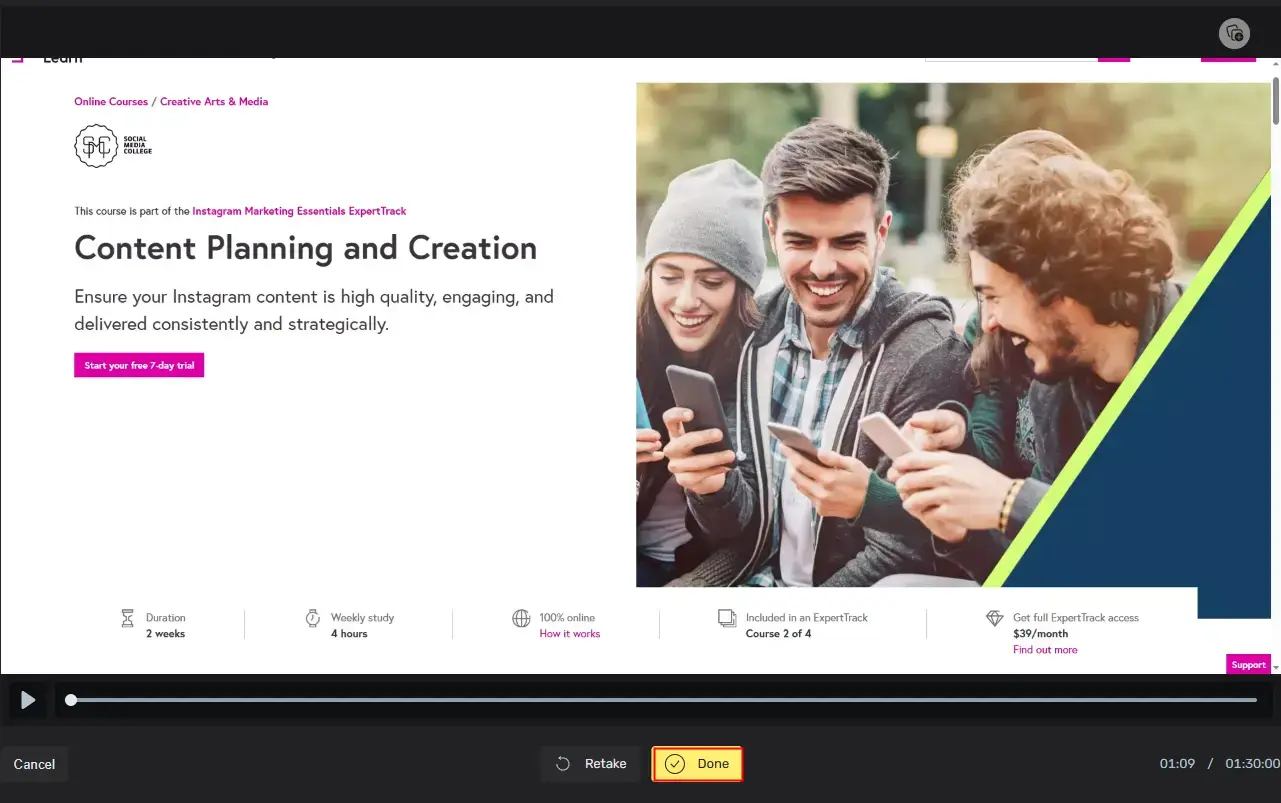
Step 6. Hit Stop at the bottom or Stop sharing at the top to end your recording.

Step 7. Press Done.
Step 8. Go to Save, confirm your output options and then hit Export.
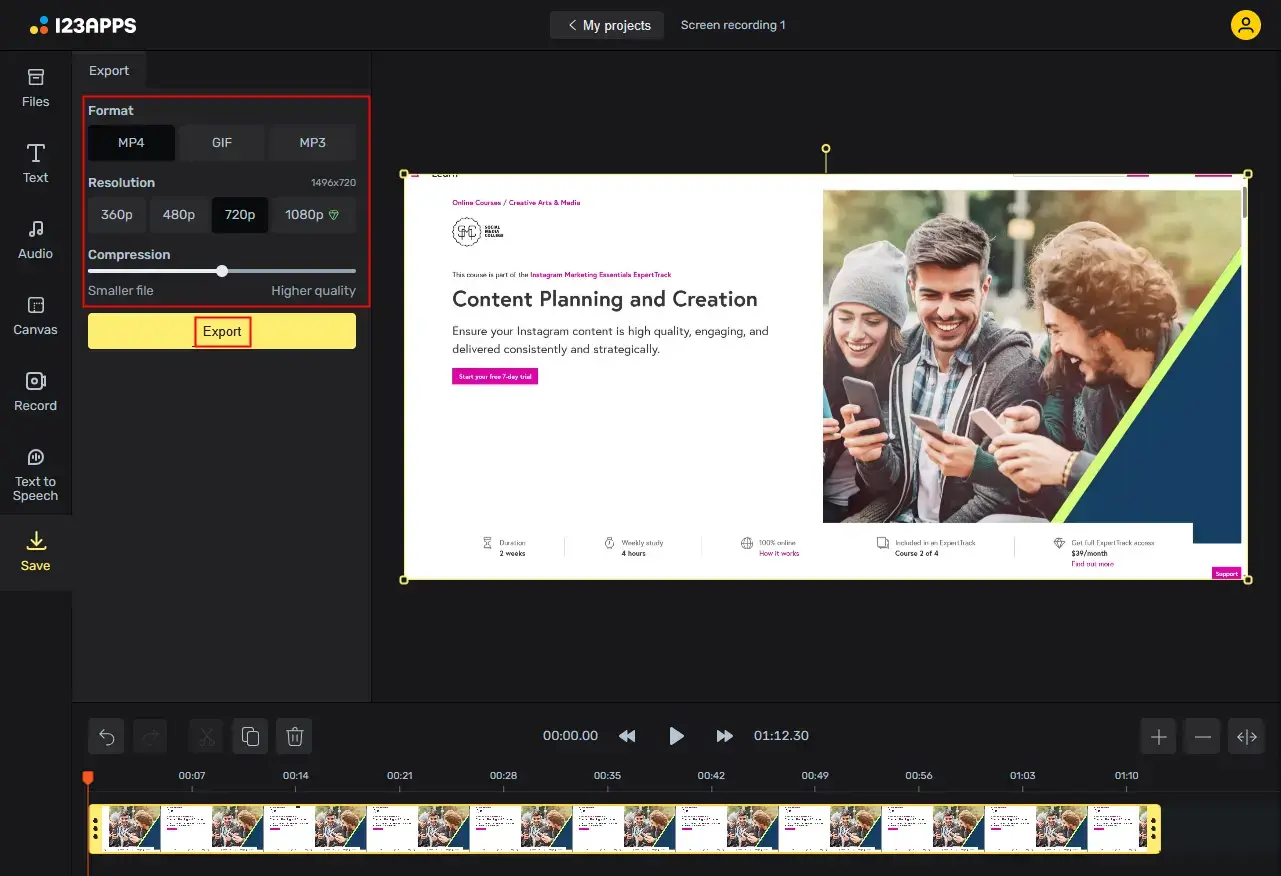
📢Note: Your recording will be moved to the online video editor of 123 Apps. You can edit it as you like there.
✨Our Advice
More to Share
🎯How to record lectures for students on my computer?
If you are a teacher who plans to record a lecture for your students, the aforementioned solutions can be helpful to realize this goal.
- Windows: WorkinTool Capture Screen Recorder
- Mac: OBS Studio
- Online: 123 Apps (Online Screen Recorder)
📂How to record lectures for students with WorkinTool Capture Screen Recorder?
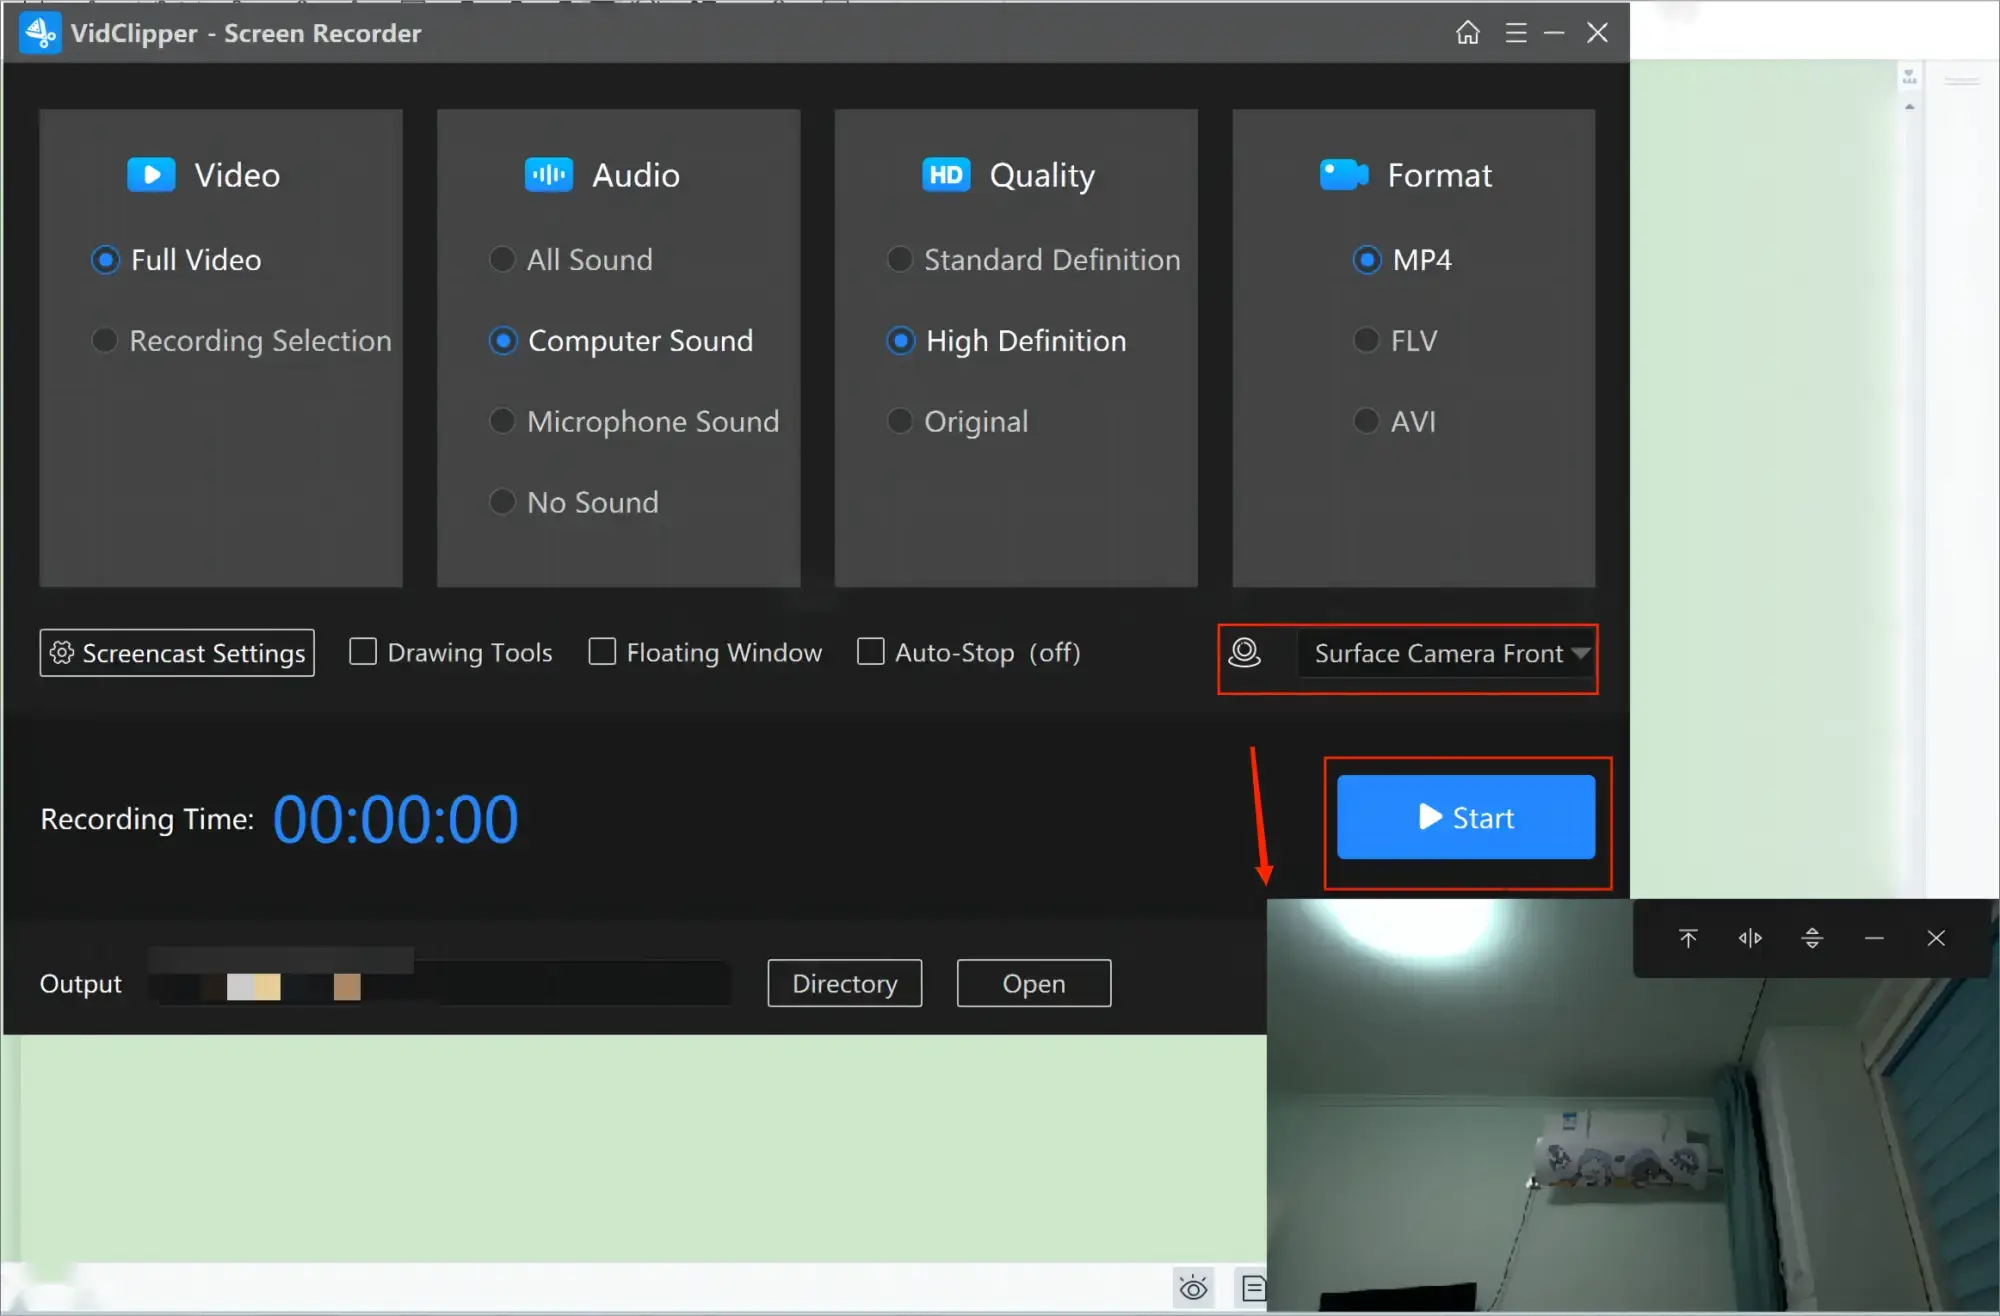
Step 1. Launch VidClipper and then select Screen Recorder on the right menu.
Step 2. Mark the recording options (Entire Screen + All Audio + High Definition + MP4) and then choose your camera from the drop-down box.
Step 3. Use the screencast settings to highlight mouse pointer if needed and then hit Start (Alt+F1).
Step 4. Activate the drawing toolbar and/or auto-stop feature to facilitate your recording if necessary.
Step 5. Click the Pause (Alt+F1) and Stop (Alt+F2) on the floating window or recording page to temporarily or permanently stop your recording.
Step 6. Choose your next move.
🎯What is the best method to record lectures?
Well, it is hard to define the best method to achieve this goal. You need to figure out your core needs before your lecture recording. However, here is a summary of the solutions outlined in this article for your reference
- Windows: Xbox Game Bar and WorkinTool Capture Screen Recorder
- Mac: Screenshot Bar and OBS Studio
- Online: 123 Apps (Online Screen Recorder)
🎯Can you record college lectures?
It is far from simple to answer this question. A lot of factors will affect the result of lecture recording in a college. However, you may be allowed to record a professor’s lecture with his or her permission. Otherwise, you should not do so, as issues regarding intellectual property or copyright are involved. Therefore, it is important to check with your professor first and never record without consent.
To record lecture audio, you have a lot of choices. Here are some suggestions:
- Windows: WorkinTool Audio Recorder and OneNote
- Mac: OBS Studio and QuickTime Player
- Android: WorkinTool TransVoice and built-in voice recorder
- iPhone: Voice Recorder Pro and Voice Memo
Final Words
This chapter concludes our discussion on how to record lectures or online classes on laptop. This is a valuable skill that can greatly enhance your online learning experience. By following the methods mentioned in this article, you can easily capture and revisit important information from your online classes. Whether you opt for the built-in software available on your laptop or the third-party apps, the key is to find a method that suits your needs and preferences.
However, if you are a Windows user looking for a handy desktop screen recorder, WorkinTool Capture Screen Recorder is your ideal option. It is user-friendly, easy to use, reliable and multi-functional to do more than just lecture recording.
Remember to respect any privacy and recording policies set by your educational institution and always seek permission when necessary. Now, grab your laptop, choose the approach that works best for you and start recording those lectures with ease.
![]()